Date: 16-06-24  Time: 01:59 am

Author Topic: Moulding  (Read 1689 times)

NorthWestern

  • GP Hero
  • ******
  • Posts: 1,028
    • Main bike:
      FZS 1000 Gen1
    • View Profile
Moulding
« on: 16 December 2013, 07:43:16 pm »
Was going to put this in the 1000 section but I guess it could be a general thing...  I then thought of putting it in the "what have you done" thread but I think this would suit its own.


As some may remember I previously mentioned making some carbon fibre parts for a gen 1 fazer 1000.  I made a bit of a start yesterday, making a mould of the left hand airbox cover.  The moulds are made from chop strand mat glass fibre so not really that eye catching but thought some might be interested (given it had a fair bit of interest).


Also I had offers of lending peoples parts to take moulds off so this might serve as a bit of an eye opener to what happens and how the original part is affected by the process.  (I need the fairing infills for my bike as I bought it as a cat c write off and they were smashed).  My plan would be to make a mould to make CF versions from...


Anyway, as its been a few moons since I last did anything with composites I made a mould and here is the progress.


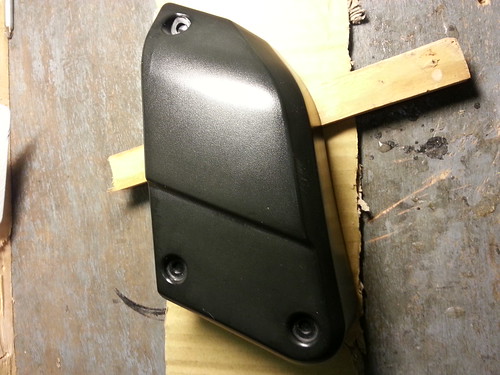
This is the part.  At this stage it has been lavished with attention, washed, dried, waxed (with carnuba release wax) 3 times and buffed after curing each coat then coated with PVA release and left to dry.  This is to ensure the part comes out of the mould as easily as possible and without damaging the mould surface.


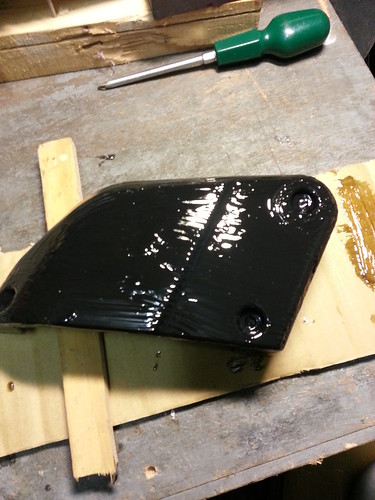
Next up I put some clear coat gel on with 3% hardner.  I added a pinch of black dye to make finishing the mould easier (you can see light reflections much clearer).  There is no real finesse to this really, slap it on, push it about as best as you can.  Due to the release making it so slippery its a bit like painting on glass!  Here it is, dyed black.  You can see its black?  Me too...


This was left to go tacky.  I have an extremely specialist bit of equipment for curing.  Many knowledgeable people are now nodding, "autoclave?, oven?" no, a double lined cardboard box with a hole in it.  Through the hole I poke a hair-dryer, 30 seconds of "Turbo Heat" warms it nicely even in a garage at this time of year.  I came to the 30 second mark after consulting Nicky Clark. He is alright that lad...  This can be left for 15 mins between adding more hot air (from the hairdryer not Nicky).


Once tacky Its the fun part, putting the fibreglass on (yaay).  Poly resin, hardner, brush, acetone at the ready, Surgeons gloves.  The heady smells...


Anywho, as I said, its been a very long time since doing this stuff and although I prepared the fibreglass to lay up I failed to remember how tight you can lay it up over curves (and probably lots inbetween).  This part has an almost 90 degree bend for the sides, one side also has a very short skirt, 4mm or so which made it tricky to get the glass to lay on nicely - it wanted to remain parelell to the top.  With the resin curing fast and me faffing with the bold recesses making sure they are done it all got away from me.  I decided to scrap this as a working mould layup and carried on purely in the interests of regaining familiarity.  I had also made a bit of a faux pas with handling it, I had pulled a thumb sized piece of clearcoat off when I needed to move it when laying up one of the skirts.


So I did the best I could, got rid of the air bubbles etc and didn't concern myself with the short skirt problem.  By now the resin was curing enough to make it non-viable to correct.  I only put 2 layers on anyway.


This is the mould exterior.


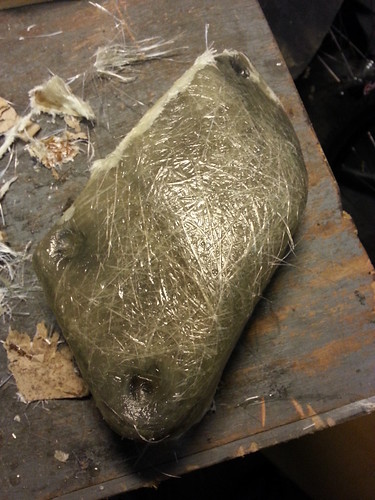
I have trimmed some of the excess from it already.  So you can see, its got the shape etc.  At this stage its unfinished (obviously)  and if it was a working mould it would be finished with nice trimming and knocking off any stray strands etc to make handling less dangerous.


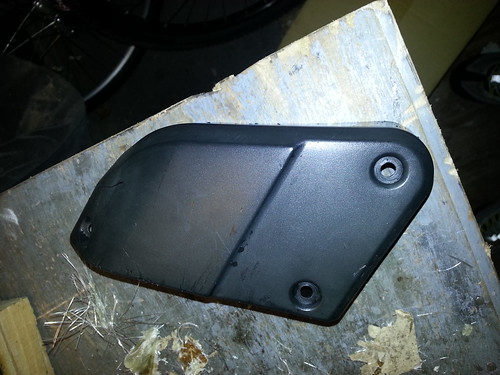
Popping the part out of the mould made me a bit sad.  It was nigh on perfect!!  I was a little rough pulling it out as I was not trying to maintain any nice surfaces on it due to the prefix that I was scrapping it but yeah, this yielded a very useable mould.


Here it is


There are a couple of dry strands fallen in after cleaning it, these can literally be blown out, the part is hard and very accurate, you can even see the markings around the bolt holes left by the bolts.  This has the textured surface of the standard part, I was toying with the idea of having two sets of moulds, one with the texture and the other with the glassy smooth surface of contemporary CF parts.  This mould would have been sanded glassy smooth with 1200 grit paper and G3 rubbing compound.  Still, all is not lost, it was a good refresher exercise and I now recall enough to make the next mould a workable and accurate one. 


As a matter of interest, this is the part after pulling out of the mould, its as is, I have not cleaned anything off it.  You can see that it is unmarked and can be refitted in perfect condition (well, as perfect as it was before).  The mould making doesn't affect it in any way.  The shiney bits on it are simply bits of release/resin left behind.


So yeah, all in all although it didn't result in a working mould it was a brilliant and useful thing to get through.  Not sure when I will get to making the next mould, I will probably do both sides at the same time now I am confident with the materials again.  I have to pick my time to work as my garage is attached to the house and the chemicals are a bit pongy...


Intentionally left blank

NorthWestern

  • GP Hero
  • ******
  • Posts: 1,028
    • Main bike:
      FZS 1000 Gen1
    • View Profile
Re: Moulding
« Reply #1 on: 16 December 2013, 07:45:33 pm »
tut, i forgot to mention...  I made a big fuss about the black dye for a reason :)


You can see that the dried part is in fact clear.  Odd that - the dyed clear coat is jet black - enough for me to stop adding dye when mixing.  Must add more next time.
Intentionally left blank

limax2

  • Creep.
  • GP Hero
  • ******
  • Posts: 1,930
    • Main bike:
      FZS600 00-01
    • View Profile
Re: Moulding
« Reply #2 on: 16 December 2013, 11:16:26 pm »
Interesting read. Good luck with the next one  :thumbup  It brought back happy memories of itching arms and spending the next day peeling bits of hard resin from my hands and scrapping it off the finger nails. (Maybe I should have worn gloves  :o ). I think my greatest success was a mould to produce rear mudguards for the lads schoolboy motocross bike as he managed to break quite a few.

taurus66

  • CBT Wobbler
  • *
  • Posts: 38
    • Main bike:
      FZS600 00-01
    • - Kawasaki ZR7S
    • View Profile
Re: Moulding
« Reply #3 on: 17 December 2013, 10:26:50 pm »
Hi there,

Nice effort... These are some of what I make in the spring time for the over seas markets and a small amount for local buyers.
I make mainly for the classic Japanese bike, namely the Honda  Nighthawk range & The custom range, NTV,Goldwing GL1200, XJ550Seca in total I have about 35 different originals that I am in the process of replicating. Of which about 15 have already been done so.
« Last Edit: 18 December 2013, 09:37:52 pm by taurus66 »

NorthWestern

  • GP Hero
  • ******
  • Posts: 1,028
    • Main bike:
      FZS 1000 Gen1
    • View Profile
Re: Moulding
« Reply #4 on: 28 December 2013, 05:45:27 pm »
The next attempt at making the mould went really quite well.  The mould is flawless and with the final sanding/polishing will be ready to pop carbon parts out of it!  Here it is freshly popped out and still has the surface texture of the original part.  This will be sanded to a glass like smooth finish.


The bolt holes need a bit of tidy up.  I left them as posts on the mould as I was unsure what the best way of simplifying the finishing of the part would be.  I will be grinding these down to little nibs to act as pilot depressions for drilling into the carbon part.


The soon to be defunct ABS plastic part, still perfectly servicable.


« Last Edit: 28 December 2013, 05:47:09 pm by NorthWestern »
Intentionally left blank

NorthWestern

  • GP Hero
  • ******
  • Posts: 1,028
    • Main bike:
      FZS 1000 Gen1
    • View Profile
Re: Moulding
« Reply #5 on: 28 December 2013, 08:58:14 pm »
Probably around 40 plus postage. I fancy making a one piece carbon mudguard with an extended rear bit
Intentionally left blank

NorthWestern

  • GP Hero
  • ******
  • Posts: 1,028
    • Main bike:
      FZS 1000 Gen1
    • View Profile
Re: Moulding
« Reply #6 on: 03 January 2014, 06:17:29 pm »
ha,


Well after an hour or so getting the mould glass smooth (pain in the ar*e around the screw hole posts etc) with 1200 grit paper and then G3 polishing compound I did my first lay up in years!


Regular fibre glassing using chop strand mat (basically if you have any fibre glass products its done using CSM) is relatively straight forward, your interested in maintaining consistent thickness and no air bubbles or bridging.  Thats not really rocket science - although looking at some products on the market it is.... :eek


Using CF is a little different as you need (well not need but if you don't then its sort of defeating the point aesthetically ) to keep the weave pattern nice and even and reduce the number of cuts.  That little extra detail makes a world of difference really.


So, I pulled my first part out and its not bad.  I got it done with a single piece of uncut CF.  As usual when revisiting old things you generally remember how you used to do it just after you have commited the part :)  So just as I started to get the position of the CF set I remembered how it is done properly :)  But to do it that way when I remembered would have meant wasting the CF as it was now partially stuck to the gel coat and pulling it off would distort and fray the strands.  I continued anyway in the interests of triggering more recollections.


So here it is:


As you can see its far from useable, even if I filled&polished the bridge holes it would look a bit off due to some hazing and pattern distortion.


You will also notice that the CF pattern is not the regular 2x2 twill that is common today, this is plain weave that was much more common back in the day and is simply some left over bits.  Plain is harder to manipulate into curves etc so it is good practice.  I will be doing parts in the 2x2 twill as I need to order more cloth anyway.  Personally I prefer the carbon/kevlar combo weave that used to be used on GP bikes in the late 80's early 90's and some of the early WSB Ducatis and Muzzy kwakers, that is the usual CF pattern but with flashes of yellow thread in it, looked proper trick.


So yeah, not perfect by any means but its coming back and the next part should be desirable/usable.  Its pretty light and durable as it is.  I am pleased with the mould, the part popped out easily enough, I was expecting a bit of a struggle with an unseasoned mould especially as some of the bolt posts are tight in.  The best part was that it had no pinholes, the surfaces that are not hazed or dry are in fact very nice.


I could have kept this to myself :)  but I wanted to show a bit of progress rather than "hey here is a perfect part"...


Intentionally left blank

MarkWales

  • Club Racer
  • ****
  • Posts: 250
    • Main bike:
      FZS600 98-99
    • View Profile
Re: Moulding
« Reply #7 on: 06 January 2014, 08:31:07 pm »
looks great so far I look forward to seeing them progress