Date: 27-04-24  Time: 19:59 pm

Author Topic: Project Ruby Racer (custom FZS600)  (Read 69337 times)

Ruby Racing

  • Club Racer
  • ****
  • Posts: 448
    • Main bike:
      FZS600 98-99
    • - Kawasaki ZRX1200R
    • View Profile
Project Ruby Racer (custom FZS600)
« on: 07 November 2013, 12:47:25 am »

I finished my first project bike on 1 September 2010. It was a fantastic moment as my vision had become reality and I was very happy with how it turned out.
And then a moment of disappointment. Why? Well, I didn't have a project bike to do anymore. As much as I wanted to finish the build, the process of the build is
the best part. Making things yourself, solving problems, etc. So time to find another project.


It's taken a while, but I got there in the end. I was inspired by the Kawasaki Z1000 (I love old Kawasaki Zeds) that Jon Keeling of Racefit built (see picture below)
using a three and a half grand Spondon frame. In fact I would have loved to have owned it, however I doubt my pockets would have been deep enough. I really like the whole 1980's AMA
superbike racer look, so decided I'd like to build my own idea of one.


Next thing was to decide on a bike to start the build from. I'd thought about a modern version using the 2003 Z1000 and then discounted it for various reasons.
I already have a 2001 Kawasaki ZRX1200R and seriously thought about getting another one and ripping into it. They are heavy bikes and trying to get the weight
down would have taken a lot of work. So that idea came and went. There were a few other thoughts, including an original Z1000 and if it wasn't for their values
going up right now I might have gone down that path.


I kept a lookout in the local online classifieds and eventually I saw a bike I thought would work. It was a 1999 Yamaha Fazer FZS600 that had had a front end
shunt bending the forks. I planned on fitting USD forks, so bent forks weren't a problem as long as the frame was straight. The thing that sold me was the shape
of the frame, particularly the bend near the foot pegs as it reminded me of the Spondon frame. Also the fake air cooled look of the engine. The price was also right
as I picked it up for a few hundred quid.


The plan is to build my own AMA type racer. I had intended to do this build just to create a unique road bike for myself, but the
fact I want to base it loosely on an 80's race bike got me thinking. I had raced a 1,000cc sports bike in the BMCRC Powerbikes class for three years from 2007 to 2009.
I stopped because the amount of traveling got to be too much (every race meeting involves two cross channel ferry journeys and lots of charging up and down motorways),
however I still miss it a little and before I stopped I had been thinking of changing class into one a little more suited to my ability, namely Thunderbikes
(or Thunderbirds as I like to call them). The main regulation for the class is a strict power to weight ratio and is aimed at older bikes. All to keep the costs down
and the racing close.


A VERY rough outline of what I'm planning on building:


So I've decided to make it eligible for racing too. Thunderbikes is one class I'm going build it for and also Streetfighters. Now I know that this isn't the bike to
start turning into a racer, a beam framed sports bike would be a much better starting point and certainly in Streetfighters that's what most racers have. So it wont
be a front running bike, but I don't mind. It doesn't matter where you are in a race. If you're having a dice with someone, that's all that matters.


There are a number of race regulations that have to be followed including a catch tank for all vent hoses, a bellypan that can hold a certain amount of fluid,
lock wire of oil filler and drain bolts, etc which I will incorporate in the build. However the main class rules I have to adhere to are as follows:


Thunderbikes


Sports Thunderbikes - 1 SAE bhp per 1.81kg weight up to a maximum of 105bhp


Streetfighter


Up to 600cc 4 cylinder with a maximum horsepower limit of 100bhp
Handlebars must be mounted above the top yoke and mounted so that the bar ends are higher than the bar mounting point
Nose cones and or bikini fairings must not protrude back past the headstock and must fit behind a theoretical template measuring 480mm horizontal and 330mm
vertical when viewed from the front.


As Streetfighters has a power limit of 100bhp, irrespective of weight, then that is the maximum I can have the motor producing to be eligible for both classes.
From a quick internet search it looks like a standardish Fazer puts out about 85bhp at the rear wheel. Someway short of 100bhp so I'll have to focus my efforts on
weight reduction, which is in my plans anyway. Using the Thunderbikes formula that would mean a minimum weight of 154kg. The factory quoted dry weight for
the standard bike is 189kg. So that's 35kg the bike needs to shed. That might be hard to do, so some mild engine tuning may also be needed. I'll concentrate on
a Weight Watchers program first and see where that gets me.


In the back of my mind I realise I may not actually be able to get the look I'm after. So I have a plan B. Back in 1998 I saw a concept bike in one of the
motorcycle magazines that really caught my fancy. It was based on the FZS600 with clip ons, a race seat and modified fairing among other things.


Here's a copy of that article.


I got thinking a bit more and thought that if plan A does work, then my next project could be plan B with another FZS600. Then I thought some more. The majority
of the things I want to do would apply to both bikes, so why not make the two bikes out of one? The only bits I would need to change are the front fairing, the
tail unit, petrol tank and the handle bars. So that's the plan: one bike, two looks.


Project Ruby Racer is GO!
Feel the Fear and do it anyway!

Read about my Project Ruby Racer - FZS 600 Custom build Click this link > > > http://foc-u.co.uk/index.php/topic,10613.0.html

Ruby Racing

  • Club Racer
  • ****
  • Posts: 448
    • Main bike:
      FZS600 98-99
    • - Kawasaki ZRX1200R
    • View Profile
Re: Project Ruby Racer (custom FZS600)
« Reply #1 on: 07 November 2013, 12:57:35 am »

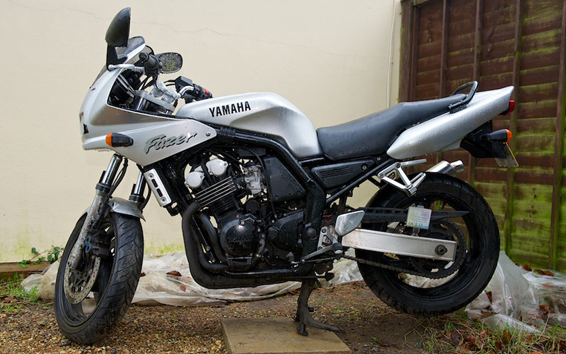
Day 1 - 11-1-13 - Bought bike and collected. Involved in a 20mph front end crash. Started motor after charging battery and runs OK.


Day 2 - 15-1-13 - Asses damage. Remove fairing which had most of mounting lugs snapped off. A chunk missing. Headlight mount snapped. Front mudguard broken.
One fork leg bent the other snapped just below the bottom yoke. Right hand engine case cracked, cover for starter gear. I got a second hand cover from Fazer Owners Club
forum (FOC) member and second hand forks from later model with preload adjusters from eBay.


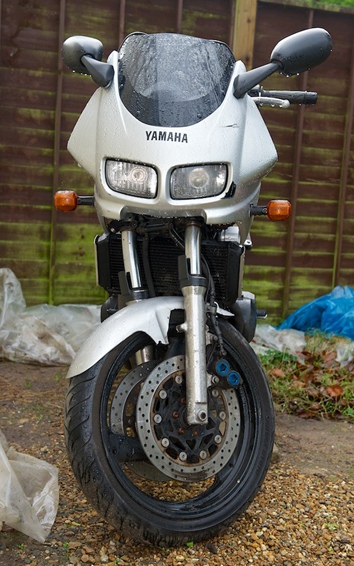
Photos of new forks fitted.


Radiator bent. Fairing bracket looks bent. Fairing lugs on frame bent. Right footrest bent. Left disc slightly warped but decided that by looking at it. Main frame appears
not to be bent, although there are a couple of paint flakes at two weld points on right side of frame near headstock area. Brake lever bent. Front wheel axle bent, so got
second hand replacement off eBay.


Photo of possible crease in frame. I hope not.


Although I've bought some parts I wont be using in my build I wanted to ride the bike first to see if it was OK.


Day 3 - 4-2-13 - Replacement forks and axle fitted. Left brake disc removed and aluminium plate mounted between brake pads on left caliper. Right engine cover fitted
with silicone gasket. Battery charged but it's dead. Used battery from Daytona and fired up after a couple of attempts. Went for a ride up the lane only first gear and second.
Has a wine connected with speed. I had a 2002 R1 that was quite whiny from the gearbox, but this sounds worse. Put bike on centre stand and ran in first gear. No whine!


Photo of one of the front discs removed which was warped.


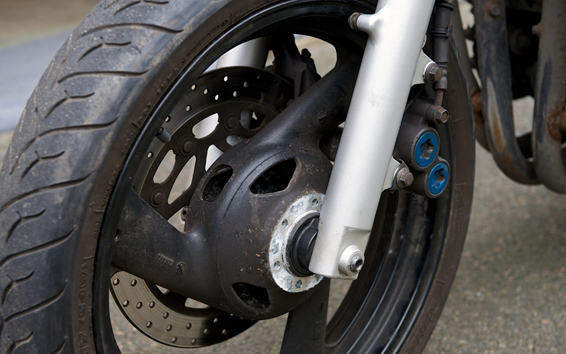
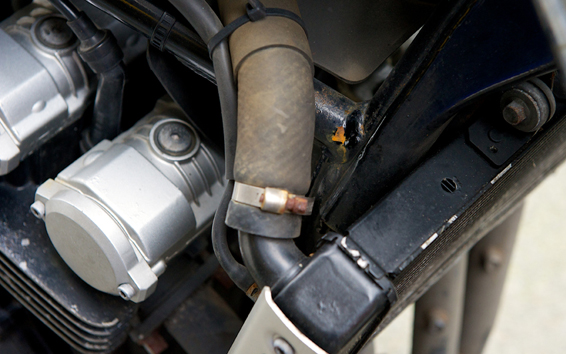
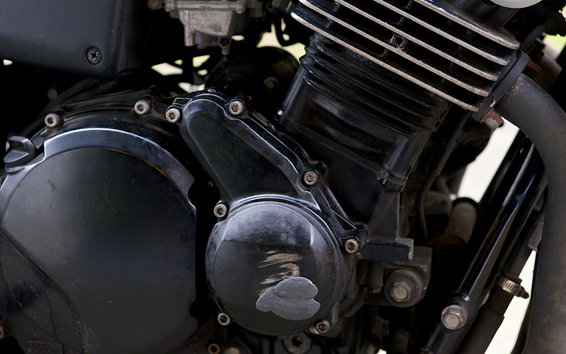
Photo of rough and ready repair to engine case.


As it's had a front end smash and the axle was bent, I'm guessing the bearings are damaged. I could get a second hand wheel and tyre for thirty quid, but it's yet more parts
I wont be using in the build, so I bought some new bearings for four pounds! Much better.


Although only ridden slowly the motor felt nice and smooth.


Day 4 - 5-2-13 - As I was waiting for the bearings to arrive I set to on removing the swing arm so I could measure it properly. I had also got ahead of myself and bought
an FZR1000 EXUP swing arm off eBay for twenty quid. Seemed too cheap to miss. I wanted one that wasn't too trick looking to keep in with the '80's look. I also hoped that being Yamaha
it might slot in easier than another brand. It's 10mm wider at the part that attaches to the frame. I can't be certain yet but it looks like most of that has to come off one
side. Will ponder how to get around this.


The axle between the frame is also bigger on the EXUP swing arm so I need to find a way of using the Fazer one. First thoughts are to make up a tubular sleeve to fit tight
inside the swing arm and then fit the correct sized bearing for the axle to fit in. I'll speak to me friendly fabrication expert to see if this is viable or what would be better.


I'd need new dust seals and spacers which shouldn't be too difficult to alter.


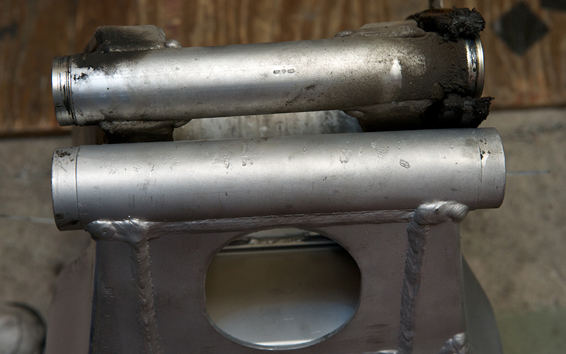
Photo of Yamaha FZR1000 EXUP swing arm on left and standard Fazer FZS600 swing arm on right.


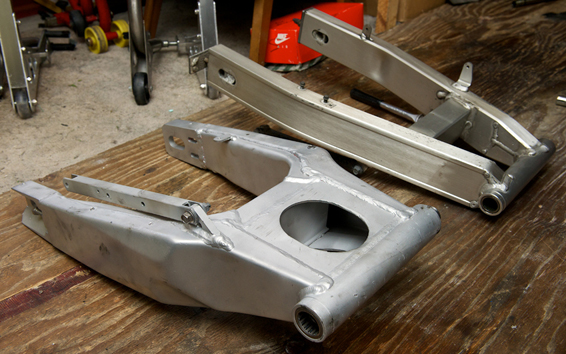
Photo of Yamaha FZR1000 EXUP swing arm on bottom and standard Fazer FZS600 swing arm on top.


Day 5 - 23-2-13 - I fitted the new front wheel bearings today. I did it pretty quickly, which surprised me. I did the old trick of putting the bearings in the freezer overnight,
the theory being that they contract a little so getting them in is easier. Once fitted I put the wheel back in and went for a ride.


I had to take it easy as I only have one front disc fitted, so only gave it a blast in first and second on a clear stretch of road. The noise had disappeared which is good.
However the gearbox does tend to whine quite a bit. This might mean that something inside the motor is damaged from running on its side when crashed, or it may well
be they all do that sir! Not having owned it prior to its tumble I don't know. However it is a similar noise to that of a 2002 R1 I used to own, so maybe it's a Yamaha thing.


From reading on the Fazer Forums the main issue that I may have is from the front wheel speed sensor. Apparently when you disconnect it it causes the engine to run
badly and throws up an error signal on the tacho. As I want to change the front end and the clocks I need to know what will happen without these components, so this is
my first major hurdle to overcome. So with the bike running again I then disconnected the front wheel speed sensor to see what effect it had on the running of the engine.
I was still only using first and second but I couldn't notice any difference. I didn't get an error signal on the rev counter either. So then I disconnected the loom that fits
into the rear of the instrument console. Same again, no noticeable effect on the engine running. If I do encounter problems then my first plan is to fit the CDI from a
YZF600R Thundercat as this uses virtually the same engine. I've looked at the wiring diagrams for each bike and it all looks virtually the same (minus the speed sensor
on the Thundercat), with the same colour wires going to the same places. So I've got a second hand CDI for twenty quid and we'll see if that will work.


I don't really want to push the bike in it's current poor set up so I think I'm going to press on with the suspension and brake upgrades, then ride it again. That's USD
forks and a decent swing arm and shock. I already have an EXUP swing arm and have run into a problem already. I bought it off eBay and it was described as immaculate. Well
it isn't and I have found that one of the adjuster bolts is stuck fast in the thread. I took it to a fabricator mate of mine and he couldn't get it out using various ingenious
methods. I now have to try and drill it out. Not contacted the seller yet, but as it was cheap I may just take it on the chin. Too bad I already gave him positive feedback.
Apparently as the bolt is stainless steel and the swing arm aluminium they basically rust together. It's called galvanic corrosion. So it's a good idea to remove the adjuster
bolts every couple of years to prevent this.


What is nice is how smooth the motor is. I love carbs! Pretty torquey motor from what little I have wrung out of her. Not noticed anything dodgy with the handling,
but as I said not pushed it. Hopefully the frame is OK.


Still trying to decide which forks to go for. At the moment I fancy the FZ1 forks and front wheel, although they're about 20mm too short. Or those from a 2007
onwards Triumph Tiger 1050. They are fully adjustable and about 50mm longer, but better to have something to play with. If I go this route I'm hoping Daytona 675
wheels will fit as I have one of those as a track bike, so that would save money if the wet wheels could be used. Neither are popping up that often on eBay and are a bit pricy.


Day 6 - 27-5-13 - A few months have past since I last did anything. That has been because I've been trying to work out which forks to go for as I want to get the suspension
and wheels sorted first so I know the rolling chassis works before tearing the bike apart and cutting bits off.


Well I've found a pair by accident. I went out for a couple of drinks with one of my biking buddies who I don't see very often. We were talking bikes (what else?!) and
he mentioned he was storing a bike that his friends son had had written off (not his fault). I had a look at it and the fork length from the top of the fork to the centre of
the axle was pretty much the same as the Fazer. Also the gap between the top and bottom yoke was identical. I wanted to get them to be the same length because if
you fit forks from a sports bike you generally end up with shorter forks. This can mess up the handling and it will also make the bike ride a little lower, so reducing
ground clearance.


As a bonus the wheel design was exactly what I had in mind, a thin, square section five spoke design. The donor bike? It's a 2005 990 KTM Super Duke. Time to
trawl eBay for the parts. After my research I found I'd be spending a few hundred pounds for second hand forks, wheels, brakes and master cylinder. So I hatched a plan.
The written off bike had been sitting for over 6 months, so I thought the owner might be interested in selling the whole bike, especially as he had replaced it with
another one anyway. He did want to sell and amazingly the price I was willing to pay was exactly the same as what he wanted. Deal.


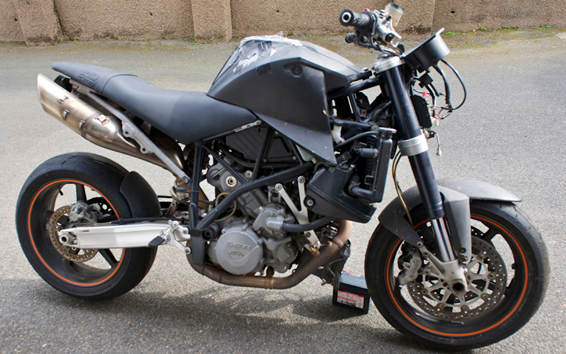
Photo of the 2005 KTM Super Duke 990 before taking it apart.


My plan was to break the bike, take the parts I needed and then sell the rest on eBay. Strip down took a whole day and then another morning to photograph
the parts and list all the items. Fortunately pretty much everything sold which meant I now had the garage space to start work on project Ruby Racer.


Photo of the 2005 KTM Super Duke 990 after taking it apart!


Feel the Fear and do it anyway!

Read about my Project Ruby Racer - FZS 600 Custom build Click this link > > > http://foc-u.co.uk/index.php/topic,10613.0.html

Chris

  • GP Hero
  • ******
  • Posts: 1,982
    • Main bike:
      FZS600 02-03
    • View Profile
Re: Project Ruby Racer (custom FZS600)
« Reply #2 on: 07 November 2013, 01:18:42 am »
Sounds great mate but I can't see any of the pictures...  :(  Could be the work computer I'm using though..
 
Chris

It wouldn't be fun if it was easy, I just wish it wasn't this much fun.

apage16

  • Club Racer
  • ****
  • Posts: 339
    • Main bike:
      FZ1 Naked Gen2
    • View Profile
Re: Project Ruby Racer (custom FZS600)
« Reply #3 on: 07 November 2013, 12:57:35 pm »
Sounds great so far! Looking forward to seeing how you realise your vision!

Wish I had the time and the cash for a mechanical rebuild rather than just the cosmetic one I'm doing.

Also really want to get myself on a track for the first time next year!

Keep it  coming!

ChristoT

  • Alleged Foc-u Daphnis & Chloe expert
  • GP Hero
  • ******
  • Posts: 5,207
  • Fluent in English, French and bullshit!
    • Main bike:
      FZS600 98-99
    • - Saab 9-3, caravan, hang glider
    • View Profile
Re: Project Ruby Racer (custom FZS600)
« Reply #4 on: 07 November 2013, 01:27:14 pm »
Looks awesome! Keep the posts coming!  :)
The Deef's apprentice

limax2

  • Creep.
  • GP Hero
  • ******
  • Posts: 1,929
    • Main bike:
      FZS600 00-01
    • View Profile
Re: Project Ruby Racer (custom FZS600)
« Reply #5 on: 07 November 2013, 07:37:57 pm »
An interesting read and nice work so far  :thumbup . Good luck with it and I'll look forward to the next instalment.

Fuzzy

  • WSB Pack Hound
  • *****
  • Posts: 683
    • Main bike:
      FZS600 00-01
    • View Profile
Re: Project Ruby Racer (custom FZS600)
« Reply #6 on: 08 November 2013, 06:47:41 pm »
Awesome, will be following this one :thumbup

Ruby Racing

  • Club Racer
  • ****
  • Posts: 448
    • Main bike:
      FZS600 98-99
    • - Kawasaki ZRX1200R
    • View Profile
Re: Project Ruby Racer (custom FZS600)
« Reply #7 on: 09 November 2013, 04:01:24 pm »
Thanks for the support guys. Next instalment coming soon.
Feel the Fear and do it anyway!

Read about my Project Ruby Racer - FZS 600 Custom build Click this link > > > http://foc-u.co.uk/index.php/topic,10613.0.html

Ruby Racing

  • Club Racer
  • ****
  • Posts: 448
    • Main bike:
      FZS600 98-99
    • - Kawasaki ZRX1200R
    • View Profile
Re: Project Ruby Racer (custom FZS600)
« Reply #8 on: 15 November 2013, 05:05:51 pm »

Day 7 - Dropped the forks out and offered up the KTM yokes to see if they will fit. Looks OK, but will need work. First job is to press out the steering
stem from both yokes and fit the Fazer stem into the KTM yokes. I took them along to my friendly fabricator who has an hydraulic press at his disposal. They pop
out easily. I had thought that I would need to sleeve the Fazer stem to fit in the KTM bottom yoke. However by a stroke of amazing luck both stems are exactly
30mm wide where they press into the yokes. This is seriously lucky.


With the Fazer stem pressed into the KTM yoke I trundle off back to my garage to fit it. All goes well except there is not enough thread showing above the
top yoke, so I can't fit the stem nuts. The bottom yoke needs machining to remove 7mm so that the stem can be pressed in that extra length.


I will also need to make an insert for the top yoke to locate the stem centrally in the bigger hole of the KTM top yoke. I design a simple "top hat" design for that.


Underside of KTM lower yoke:


Underside of Fazer lower yoke:


Day 8 - Lot of measuring of swing arms, bearings, sprocket offset, etc. Removed bearings in EXUP swing arm. Went to a fabrication company to source
some bearings for the swing arm. The OE ones are 30mm wide with a 28mm ID. I need them to be 25mm wide with a 24mm ID. The nearest is only 20mm wide.
Would prefer to keep as close to standard as possible, but this is my only choice. However there is a lip to stop the bearing going too far inside the swing arm which
the OE bearing did not press up against. So I may actually be able to get another 30mm wide one in there. Will have to check this. That lip is approx 36mm inside,
so after I take off 5mm from the end that leaves me with 31mm to play with, so another bearing with the reduced inside diameter of 24mm, but 30mm width is
potentially doable now. I would prefer to keep the bearing size as close to OE as possible as greater minds than mine have decided that that is an optimum size.


Tried to take some accurate measurements of the sprocket offset on the rear wheel. From a chat on the Fazer Forum with Wraith600 who had installed an Aprilia
rear wheel on his build, he suggested the maximum offset the frame could handle before the chain hits the frame is around 10mm.


I took two measurements from the KTM and Fazer rear wheel. The first was using the seam on the wheel spoke that was in the centre of the hub to the centre
point of the sprocket teeth. That gave me a difference between the two wheels of 2.48mm. The KTM sprocket being 2.48mm further from the hub than the Fazer
wheel. The second I used a straight edge placed on the sprocket and another straight edge flat on the sides of the tyre so they were parallel. Took a measurement
between the the two straight edges and then subtracted half the width of the sprocket to get the offset figure. Glad to say that this figure came to 2.5mm and so
confirmed my first measurement as being accurate (hopefully!) and well within the limit of 10mm that Wraith600 suggested.


The KTM had a 525 chain fitted and the Fazer a 530, so this will further aid clearance. Although a 2.5mm offset doesn't sound too bad to me, however I've never
done this before so it could all go a bit Pete Tong. I understand from Wraith600 that I can order a custom made front sprocket from Talon to incorporate the
additional offset. This will prevent any dodgy bodging on my part. The upside is that things are looking positive.


Day 9 - 1-10-13 - Fabrication course at college. Finally got the chance to remove some metal from KTM bottom yoke so I can get the Fazer stem to be at the correct
height above the top yoke. The Fazer stem is pressed back in. Didn't get back from College until 2130 and I was making dinner as my wife had been out too doing
Pilates. So first job in the morning is to offer up the yokes again. Fingers crossed I've got my measurements correct. Started on making the insert for the top yoke
on the lathe, but ran out of time. Won't be able to finish that until next week. Blast. Was hoping I could pretty much finish the front end graft on. Never mind it will
give me the chance to double check my calculations for the insert for the top yoke.


Starting work on insert for top yoke. Ran out of time so will be finished next week. How frustrating.


Day 10 - 2-10-13 - Yoke fits nicely and I can get both lock nuts on. Looks like the KTM yokes are not quite as kicked out as the standard ones, so I hope I don't run
into any tank slappers. A steering damper is on the cards any way, just have to work out how to fit it. There are no stops for the lock nuts to work against so I'll get
some welded to the underside of the headstock once the bike is completely stripped.
Feel the Fear and do it anyway!

Read about my Project Ruby Racer - FZS 600 Custom build Click this link > > > http://foc-u.co.uk/index.php/topic,10613.0.html

Ruby Racing

  • Club Racer
  • ****
  • Posts: 448
    • Main bike:
      FZS600 98-99
    • - Kawasaki ZRX1200R
    • View Profile
Re: Project Ruby Racer (custom FZS600)
« Reply #9 on: 15 November 2013, 05:11:31 pm »
Day 11 - 3-10-13 - Designed a bracket to accept standard clocks for trial run when suspension fitted. Cleaned calipers.


Day 12 - 5-10-13 - Made aluminium bracket for standard clocks so I can road test new forks and rear swing arm and suspension. Looked at possible
positions for steering damper. Fitted new front brake reservoir and brake lever pivot pin to Brembo brakes from KTM. Cleaned master cylinder.


Day 13 - 8-10-13 - Fabrication course at college. Finished insert for top yoke on lathe. Took me all evening! Well, I am learning a new skill. However
most of the time was spent turning down the round bar of aluminium I was using from 50mm to 32.5mm wide. I had to do this 1mm at a time otherwise you run
the risk of damaging the cutting tool. Also put a bend in my temporary aluminium bracket for standard clocks.


Day 14 - 9-10-13 - Fit front end: yokes, forks, wheel, brakes, indicators bodged on, instruments, handle bars, standard swing arm, shock and rear wheel,
and bled brakes, (lot of black specks coming out) tightened up the front end. Bodged the brake light to work. Ordered the triangular three way block connector so I
can join up the KTM speedo pickup to the Fazer loom. Hopefully it will work, I'm guessing they all work the same way with some kind of magnetic pick up?


Day 15 - 12-10-13 - One final check that I'd done up everything and it was time for a test ride with the KTM forks fitted. Initially I just went around the
block very slowly. Everything felt OK and tight, possibly a slight bit of play in the headstock. That may be because I wasn't able to tighten it properly, or because
the insert in the top yoke is ever so slightly too big. I plan to make a better one anyway, so not too worried about that at this stage. First impressions of the brakes
are good. In fact they feel really nice, with plenty of feel and progressive braking. After seeing all the black specs coming out in the fluid when bleeding, I'm amazed
they feel so good.


The engine still feels nice off a closed throttle. None of that snatch you get from some fuel injected bikes. Not overly eager to rev, but then it's not a sports bike.
Still have that whine present and it may well be normal. When I finally get to the frame painting stage I'll take the chance to have a look inside the motor whilst
it's out of the frame.


Came back home after a couple of laps round the block to adjust the handle bars (too far forward) and have a check around the bike to see if anything is leaking.
All seems buttoned up. So I went further afield and gave it a couple of handfuls. Seems OK. Wasn't aware of any pulling from one side or the other, so hopefully
that means the frame is straight. Just aware of some rattles somewhere. Possibly not done something up properly! Only went out for about 20 minutes and wasn't
pushing it at all at this stage. Back to the garage for some more fabrication.


Started designing a new instrument bracket to hold the Koso item I got second hand off eBay. Also started making brackets to hold the ZRX nose cone on. I was
going to incorporate them both in one, but as I plan on doing some racing there will be the inevitable off, so I decide to separate them so that breaking one doesn't
mean the whole bracket is binned. Looking forward to Tuesday as I'm off to my fabrication class and I'll be hoping to cut down on the width of the EXUP swing arm
probably using the same method as for the bottom yoke.


How would we fabricate stuff without Corn Flake packets?


Day 16 - 15-10-13 - I was hoping for a clean engineering solution to reducing the width of the EXUP swing arm pivot. Unfortunately there wasn't
time available to set this up so I did it the old fashioned way. I measured 5mm in on each side and scribed a guide line on the swing arm. Then
took a hacksaw to it to remove the majority of the metal. Then very carefully filed down the rest to get the desired width.


I did one side pretty evenly, but the other has a bit of a high spot. It's only been reduced by 9mm as well. Not a problem as this is the swing arm that has the axle
adjuster bolts stuck in, so I'm using this one as my test swing arm. Once I know how much needs removing for definite I'll be taking the other swing arm to an
engineers to get it turned down properly.


Day 17 - 22-10-13 - Evening class at college. I was on the lathe all evening and made two "plugs" to go in the end of the swing arm to take the place
of the bearings in the swing arm pivot. This is just so I can mount the swing arm in the frame and check clearances and if I can actually use the EXUP swing arm.
I also made two sleeves that would fit in the rear wheel bearings in the KTM rear wheel, with a 25mm outer diameter and 20mm inner diameter. The EXUP rear
wheel spindle is 20mm wide. Again this is so I can mock up the mounting of the rear wheel without having to spend on wheel bearings unnecessarily.


"Plug" to take the place of a bearing in the swing arm pivot to check the width I've calculated is correct.

« Last Edit: 15 November 2013, 05:14:11 pm by Ruby Racing »
Feel the Fear and do it anyway!

Read about my Project Ruby Racer - FZS 600 Custom build Click this link > > > http://foc-u.co.uk/index.php/topic,10613.0.html

Fuzzy

  • WSB Pack Hound
  • *****
  • Posts: 683
    • Main bike:
      FZS600 00-01
    • View Profile
Re: Project Ruby Racer (custom FZS600)
« Reply #10 on: 15 November 2013, 05:37:11 pm »
This is awesome, can't wait to see how it turns out!


ChristoT

  • Alleged Foc-u Daphnis & Chloe expert
  • GP Hero
  • ******
  • Posts: 5,207
  • Fluent in English, French and bullshit!
    • Main bike:
      FZS600 98-99
    • - Saab 9-3, caravan, hang glider
    • View Profile
Re: Project Ruby Racer (custom FZS600)
« Reply #11 on: 15 November 2013, 05:38:00 pm »
Looks great!

So, it's a YamasakiM front end, eh?  :lol
The Deef's apprentice

reddeviljp

  • CBT Wobbler
  • *
  • Posts: 33
    • Main bike:
      FZS600 98-99
    • View Profile
Re: Project Ruby Racer (custom FZS600)
« Reply #12 on: 16 November 2013, 12:54:25 pm »
Well impressed with that work, so far. Keep it up, sir and keep the photos coming.

Chris

  • GP Hero
  • ******
  • Posts: 1,982
    • Main bike:
      FZS600 02-03
    • View Profile
Re: Project Ruby Racer (custom FZS600)
« Reply #13 on: 16 November 2013, 03:10:26 pm »
Awesome!
 
Chris

It wouldn't be fun if it was easy, I just wish it wasn't this much fun.

Ruby Racing

  • Club Racer
  • ****
  • Posts: 448
    • Main bike:
      FZS600 98-99
    • - Kawasaki ZRX1200R
    • View Profile
Re: Project Ruby Racer (custom FZS600)
« Reply #14 on: 16 November 2013, 06:20:30 pm »


So, it's a YamasakiM front end, eh?  :lol


 :lol :lol :lol  Like it!


Thanks for the support guys. I'm not moving along at a fast pace, but I do have a nice bit of momentum and things are going well so far. Should have another update ready in the next week or two.
Feel the Fear and do it anyway!

Read about my Project Ruby Racer - FZS 600 Custom build Click this link > > > http://foc-u.co.uk/index.php/topic,10613.0.html

wraith600

  • Club Racer
  • ****
  • Posts: 286
    • Main bike:
      FZS600 98-99
    • View Profile
Re: Project Ruby Racer (custom FZS600)
« Reply #15 on: 24 November 2013, 07:15:02 pm »
nice work m8 it is quite easy to loose the weight  ;)  keep an eye on ebay for light weight  wheels they do come up occasionally if y are going for a 180/190 rear y will need  an off set front sprocket see talon for this it will cost y about £50  max offset is about 10mm and y will still need to mod the sprocket cover and thats going to a 525 chain
follow me and ile show you were to crash

http://foc-u.co.uk/index.php/topic,484.msg2583.html#msg2583

Ruby Racing

  • Club Racer
  • ****
  • Posts: 448
    • Main bike:
      FZS600 98-99
    • - Kawasaki ZRX1200R
    • View Profile
Re: Project Ruby Racer (custom FZS600)
« Reply #16 on: 24 November 2013, 08:11:26 pm »
Thanks Wraith600, and I remember you telling me about the Talon option. I called them and the price is around £85. Once I know for definite the offset I'll order it. From my measurements I reckon about 2.5mm offset, so I might get away without modifying the cover.


As for wheels. The KTM one is a 180 and it's miles lighter than the OE, so some weight lost there already. Whilst something like carbon rims would be lovely, I doubt I could stretch to the cost of them. Maybe I'll get lucky with Father Christmas!
Feel the Fear and do it anyway!

Read about my Project Ruby Racer - FZS 600 Custom build Click this link > > > http://foc-u.co.uk/index.php/topic,10613.0.html

Ruby Racing

  • Club Racer
  • ****
  • Posts: 448
    • Main bike:
      FZS600 98-99
    • - Kawasaki ZRX1200R
    • View Profile
Re: Project Ruby Racer (custom FZS600)
« Reply #17 on: 05 December 2013, 01:51:25 pm »

Day 18 - 24-10-13 - Not much done this evening. However my good friend Shaun came round to lend his professional help with the electrics. First up was the
ignition switch. I'm using the ignition from the KTM, basically because the one from the Fazer is knackered. It takes about 20 attempts to turn the key on. Also it saves
having to remove the KTM ignition from the top yoke. The wiring on each is slightly different, basically because the KTM does not have a parking light switch in the ignition.


There are 6 wires in total to the KTM ignition switch: 3 power feeds going in and 3 going out, so three pairs of two. The Fazer also has 6 wires, however it only has one power
feed going in, with one wire coming out to the parking lights and 4 other wires coming out for things like the fan, horn, etc. What this means is the wire coming out for the
parking light can be discarded and one of the 3 wires coming out will have to connect to another wire to make 4 coming out. That probably doesn't make any sense as I don't
really understand electrics. Thankfully Shaun offered to re solder the wires into the KTM ignition for me, so when the time comes I will let him do that as he knows what he is doing.


The next item for him to cast his expert eye over was the speed sensor. As I mentioned earlier, from my searches on the Fazer forum it seems that if the OE speedo is not
used in conjunction with the OE wheel speed sensor then the bike throws up a fault code. Some have suggested the bike wont run properly either.


It looks like the OE KTM wheel speed sensor can be used as like the Fazer sensor it has 3 wires coming from it. As I'm using a Koso speedo I would probably not be connecting
back to the loom, but connecting directly to the Koso speedo. This would mean the bikes ECU would not get any signal and possibly cause the fault code to appear and possibly
rough running. When we looked at the wiring for the Koso it also uses 3 wires for it's speed sensor. As the unit I bought was second hand someone had grafted on another
wire to go to the loom. Shaun thought that this was the feed for the ECU to prevent problems in the form of fault codes. If he is correct and I reckon he is, then this could be
the simple cure to ensure fitting an aftermarket speedo doesn't throw up fault codes. Time will tell on that one.


Day 19 - 25-10-13 - Managed to get a couple of hours in after work. Fitted the temporary inserts into the EXUP swing arm pivot, basically they are pretend
bearings so that I can mount it with the swing arm axle to see if I got my measurements are correct to cut down the width of it and then to see if it would fit and not hit anything.
Initial impressions are yes it does fit. The standard shock fits through, although looks a tight squeeze and the tie rods line up nicely. The exhaust can hits the swing arm, but
then it did with the standard one fitted due to the fact the bike went down on the right side and has bent the foot rest mounting lugs. Once these are bent back into place
this shouldn't be an issue.


After that I fitted the rear wheel, again with some ally inserts I made up at college. The KTM rear wheel takes a 25mm axle, however the EXUP one is 20mm thick. So the
inserts have an outside diameter of 25mm and in inside diameter of 20mm. I just insert those in the wheel bearings then pass the axle through them to mount. This puts
the wheel in the correct place so I can get it central. Once it's central I can work out what size spacers and rear brake bracket I need and also what the sprocket offset it
compared to the standard rear wheel.


I placed the wheel centrally using just my eyes and it looks like it lines right up. The calculations I did a week or so ago suggest that the offset is in fact 2.5mm. I have
some long straight metal bars that I will use to get it placed as accurately as possible and then take some measurements. Have to do some work on the house on Saturday,
so looks like Sunday will be the time for this, especially as the weather forecast is pants!


Day 20 - 28-10-13 - Trying to align rear wheel with front. Try to remove front sprocket so I can see how much the front sprocket needs to be offset. Couldn't
get the nut off.


Day 21 - 29-10-13 - Try to remove front sprocket so I can see how much the front sprocket needs to be offset. Finally get it off after bracing the rear wheel
more effectively. Fit second hand exhaust can and link pipe bought off eBay. It's a Quill titanium. Remove chain. Remove right foot rest and brake M/C.


Day 22 - 5-11-13 - Did some more work on the fairing mounts today. Got the fairing sitting as close as possible to the forks by shortening the lower mount bracket.
Have to work out how to make the top mounts look "nice".


In the evening I was at the college for my fabrication course. I worked on the lathe all evening trying to make some wheel spacers to help with lining up the rear wheel centrally.
Unfortunately I didn't even manage to make one set as I broke one of the tools and had to start again! All part of the learning curve. I'll have to wait until next week before finishing them off.


Not a huge problem as I'm waiting for new bearings for the swing arm. Last week I took the second EXUP swing arm I bought to a engineering firm to have the swing arm
pivot width machined down by 5mm on each side. They managed to do that the day after, however I'll pick it up once the bearings are in so I only have one trip to make.


Day 23 - 8-11-13 - Picked up the swing arm yesterday and today I fitted the new bearings in it. The EXUP inner axle is 28mm thick, but the EXUP is 24mm thick,
so I had to get bearings with a smaller inner diameter. The standard bearings in the Fazer swing arm are 25mm wide, however the only ones I could get at the correct internal
diameter were 20mm wide. I'm hoping that will be OK. Meanwhile I'll keep searching for some the same size as I would prefer to have these sort of things the same size or
bigger, rather than smaller than standard.


They'll be coming out when I get things powder coated, however that's some way off. As they may well get damaged on removal I'll replace them just in case. Getting
these ones in was a bit tricky on one side as the bearing kept going off centre. I didn't install them in the best way as I tapped them in with a hammer and a piece of wood
to protect them. I did the old trick of sticking the bearings in the freezer overnight and heating up the swing arm before fitting. The idea being the bearings shrink ever so
slightly in the cold and the swing arm expands ever so slightly in the heat, making the bearings drop in a lot easier. Well the first one did, but not the second. Grrrrrrrrr!


Had to trim down one of the spacers that fits between the frame and the swing arm as now each side is 5mm narrower the spacer doesn't sit flush as it hits a weld.


Had another look at my speedo bracket and realised that it would be too tight a fit to site the lap timer where I wanted it. So I adjusted the lower fairing bracket by raising it
with three extra nuts as spacers. That makes it sit a little higher and it actually looks better positioned anyway. I wont know for definite until I have all the bodywork done,
as it all needs to "flow". It has however made the design of the upper fairing mounts a bit more complex. Still thinking about how to make them look nice and not bodged.


Day 24 - 12-11-13 - At college. Made spacers 15mm and 48mm wide.


Day 25 - 13-11-13 - Fitted spacers to rear wheel. Forgot inner spacer on sprocket hub and as such when I was tightening the axle I heard some unusual noises.
Having once in the past done exactly the same thing I realised I had forgotten to insert the inner spacer. Doh! Once that was fitted the terrible noises went away. The rear
wheel lines up perfectly with number plate mark I made showing the centre of the rear wheel before removing the standard swing arm and rear wheel. Straight edges on
wheels. Seems OK.


Day 26 - 19-11-13 - At college. Made spacers for sprocket carrier. Had to sand down at home after. Took wheels in to have tyres removed so I could better line
up front and rear wheels. Pictured below the originals on the left with my custom versions on the right.


Day 27 - 23-11-13 - Fitted some LSL handlebars I bought off eBay. They are pretty much the same as the KTM OE ones, just not so swept back. They look like
new, so big improvement over the OE ones. Plus I'm not sure the OE bars are straight after their interface with the tarmac.


I spent the best part of the afternoon trying to get the wheels in line. Kept getting different readings which got very frustrating. Then I had a brainwave. I'd tightened up
the rear axle, although I hadn't torqued it up to the correct level. So I did that and my measurements completely changed. Initially my measurements showed the front wheel
was offset in relation to the rear. After torqueing up it still was, but the opposite side! Oh dear. I then torqued up the front as well, just in case.


After this I got more consistent results and it showed the front was pretty much properly in line with the rear as there was only about half a millimetre difference on either
side of the front wheel. Took a long time to get to this point, so felt I'd wasted some of the afternoon. However I was pleased that the wheels seem to be in line based on
my first measurements and the first spacers I'd made. So I allowed myself a pat on the back.


Next up I need to get myself a rear caliper, then once I have this I can design and make a bracket to hold it in place. Looking at getting a Brembo to compliment the fronts.
I'm after the one fitted to a Ducati 749/999 as it's a twin opposed piston design and is silver/grey like the fronts.


I had hoped to use the KTM one I have from the Super Duke, but it has a cut out in the bracket where the pads slot in and this would be very difficult for me to replicate.
I had hoped to go for an under slung caliper as this makes wheel fitment so much easier. After discussing this with my college tutor I felt it required too much work on the swing
arm and could possibly weaken it. As such I'm going to use the torque arm already in place on the EXUP swing arm and mount it at the top of the disc. Even though I dislike
the look of torque arms.


Once I've got the brake bracket made and reconfirm the wheels are in line I'll measure up how far the front sprocket needs to be offset.


Day 28 - 3-12-13 - I've run out of things to make at my evening class, so I remade the sleeve that fits in the top yoke. The one I made before was fractionally smaller
on the outside diameter and the pinch nut couldn't be tightened enough to grip it. Well I just managed to finish it before the end of the class and now it's fractionally too big! Blast.
I'll get some sandpaper on it and try and make it fit.


Also received a Brembo rear caliper I'd bought off eBay. So next job will be to make a bracket to mount that. I thought it was the same silver colour as the front calipers, but
it's more of a gun metal colour. Bit disappointed with that, so I may sell it and buy another that hopefully is a colour match for the fronts. Actually comparing the two together it's not
as different as I imagined. I might get away with that as they will be well away from each other. I'll see what it looks like when mounted.


« Last Edit: 05 December 2013, 02:01:04 pm by Ruby Racing »
Feel the Fear and do it anyway!

Read about my Project Ruby Racer - FZS 600 Custom build Click this link > > > http://foc-u.co.uk/index.php/topic,10613.0.html

DaxPlusPlus

  • CBT Wobbler
  • *
  • Posts: 30
    • Main bike:
      FZS600 02-03
    • View Profile
Re: Project Ruby Racer (custom FZS600)
« Reply #18 on: 05 December 2013, 09:04:01 pm »
 8) Thanks for the updates  8)

Chris

  • GP Hero
  • ******
  • Posts: 1,982
    • Main bike:
      FZS600 02-03
    • View Profile
Re: Project Ruby Racer (custom FZS600)
« Reply #19 on: 05 December 2013, 09:17:45 pm »
Great updates!

Chris

It wouldn't be fun if it was easy, I just wish it wasn't this much fun.

ChristoT

  • Alleged Foc-u Daphnis & Chloe expert
  • GP Hero
  • ******
  • Posts: 5,207
  • Fluent in English, French and bullshit!
    • Main bike:
      FZS600 98-99
    • - Saab 9-3, caravan, hang glider
    • View Profile
Re: Project Ruby Racer (custom FZS600)
« Reply #20 on: 05 December 2013, 09:49:26 pm »
Looks awesome! Keep the updates coming!  :)
The Deef's apprentice

Ruby Racing

  • Club Racer
  • ****
  • Posts: 448
    • Main bike:
      FZS600 98-99
    • - Kawasaki ZRX1200R
    • View Profile
Re: Project Ruby Racer (custom FZS600)
« Reply #21 on: 05 December 2013, 10:59:34 pm »
Thanks fellas.


They should be a bit shorter in length now as I'm bang up to date with them.
Feel the Fear and do it anyway!

Read about my Project Ruby Racer - FZS 600 Custom build Click this link > > > http://foc-u.co.uk/index.php/topic,10613.0.html

Punkstig

  • GP Hero
  • ******
  • Posts: 2,191
    • Main bike:
      FZS600 02-03
    • View Profile
Re: Project Ruby Racer (custom FZS600)
« Reply #22 on: 07 December 2013, 09:54:41 am »
It's so much better having the rear brake caliper above the swingarm rather than below.
Really bad design by yamaha on the fazer as all the crud just builds up meaning  you have to look after them more often!
Some say...

Hedgetrimmer

  • GP Hero
  • ******
  • Posts: 5,711
  • FOC-U official topiary expert
    • Main bike:
      FZS 1000 Gen1
    • View Profile
Re: Project Ruby Racer (custom FZS600)
« Reply #23 on: 07 December 2013, 09:56:48 am »
Personally, I think he just likes to get spaced out.... :rolleyes

Ruby Racing

  • Club Racer
  • ****
  • Posts: 448
    • Main bike:
      FZS600 98-99
    • - Kawasaki ZRX1200R
    • View Profile
Re: Project Ruby Racer (custom FZS600)
« Reply #24 on: 07 December 2013, 01:14:25 pm »
It's so much better having the rear brake caliper above the swingarm rather than below.
Really bad design by yamaha on the fazer as all the crud just builds up meaning  you have to look after them more often!


I have to agree. However I wanted it underslung purely for the aesthetics.


I would like to mount it without the torque arm as I think they look gash. However to weld a bracing bar on the inside of the swing arm would require far too much surgery on the swing arm. That's why I'm not doing it. Too risky as the swing arm may get weakened or distorted. The torque arm will probably be hidden to a certain extent by the silencer, so I may be able to live with it.


Personally, I think he just likes to get spaced out.... :rolleyes


 :rolleyes
« Last Edit: 07 December 2013, 01:15:36 pm by Ruby Racing »
Feel the Fear and do it anyway!

Read about my Project Ruby Racer - FZS 600 Custom build Click this link > > > http://foc-u.co.uk/index.php/topic,10613.0.html