This section allows you to view all posts made by this member. Note that you can only see posts made in areas you currently have access to.
Messages - roxburd
26
« on: 27 April 2019, 03:15:04 pm »
I still have this for sale - I think its what you're after?
http://foc-u.co.uk/index.php/topic,24944.msg292643.html#msg292643
Hi, I'm expecting equivalents of those parts to arrive shortly - it's the side-rack (that supports panniers mounted on the side of the bike) that I'm having trouble with. Thanks though.
27
« on: 27 April 2019, 01:28:21 pm »
I thought it was PL349. I just searched Givi pannier rack for FZS1000. Good luck.
Cheers dude. I may just order a PL349 from somewhere with good returns arrangements! If I can't mod it then I'll just have to send it back. "Lastly there's a bracket that bolts the 2 pannier frames together. This passes behind the numberplate." You clearly know about this stuff - my next questions are: - the bracket that bolts the 2 pannier frames together goes through the indicator mounting holes, right? - so what do you do for indicators? I know you mount them under the rear plate but do you need extra brackets? Thanks
28
« on: 27 April 2019, 11:03:13 am »
A quick search and Mad4bikes has a set in stock via Amazon. You could try them direct to see if cheaper.
The Google search site:http://mad4bikes.co.uk PL348 returns: Your search - site:http://mad4bikes.co.uk PL348 - did not match any documents. The Amazon search Mad4Bikes returns 3 items but no PL348 The Amazon search Mad4Bikes PL348 returns: No results for MAD4BIKES PL348
29
« on: 27 April 2019, 10:21:52 am »
A quick search and Mad4bikes has a set in stock via Amazon. You could try them direct to see if cheaper.
Lifesaver!! Thanks dude! Do you have a link? A search for PL348 at http://mad4bikes.co.uk returns: Your search returns no results.And I don't get any hits on Amazon. Thanks!!
30
« on: 27 April 2019, 09:58:55 am »
We're off on a tour soon and as we're two-up I really need to get my old 36 litre Monokey Givi panniers mounted on the Fazer (2001 FXS 1000). I really didn't think it would be difficult. Expensive maybe, but not difficult... I did a bit of research and it looks like there's no way to mount my old Wingrack which would have been ideal but there we go. So a couple of weeks back I ordered the side rack (PL348) from www.modulemoto.co.uk. The side-rack blurb says it must be fitted with the top rack (348FZ) so I ordered that and a top plate (M7) from www.motocard.comAll's good. Then, yesterday, I emailed ModuleMoto to find out when the rack will arrive and they said "Oh, we don't stock them any more"... what's more, I can't find one anywhere on the web (that will ship to the UK). So, I have a top rack and top plate on the way (which I only ordered because the side-rack PL348 requires them) but no side-rack and no way to mount my panniers on the bike!! Does anyone know of any way to side-mount Monokey panniers on the 2001 FZS 1000? Thanks!! The PL349 rack seems to still be available but it looks like it doesn't fit the 2001 model. Anyone know if it can be modified to fit? I would ask Givi but they have convinced me that they know nothing about their own products.
31
« on: 28 October 2018, 07:55:48 pm »
Lid off the master cylinder, then try pushing them in a little more. It could be that one of the pistons has crabbed, so they might need to be pumped out a little again, checked for squarness to the bores, then eased back in again. Failing that, it might be that you need to pull them out for seal replacement etc. To clean the crap out of the seal locations, I use a small pick tool. There are normally three in a set, one right angled, one oblique, and a straight one. Soak the crap first with something like penetrating fluid to loosen it up. Dont scratch the bores
Cheers dude
32
« on: 28 October 2018, 06:43:14 pm »
I *was* happy with the job... until I tried spinning the front wheel and found that with a good heave it only manages one rotation. I can also hear slight rubbing. Without the calipers the front spins freely so the bearings are fine. The discs don't get massively hot but still, it's not right.
Is it worth lubricating the pistons as it advises in the Haynes manual (silicone grease)? Would that make any difference? Or, as I suspect, is it going to be crap built up behind the seals causing the seals to grip the pistons? Or the seals themselves swelling for some reason and gripping the pistons? Either way, that means a proper overhaul. Bugger.
Anything I should be aware of doing a full overhaul? What's the best way to clean out the seal recesses given the difficulty in accessing them? In the past I've found muck in there that needs cleaning out.
33
« on: 27 October 2018, 03:36:00 pm »
WARNING: DO NOT TOUCH YOUR DISCS WITHOUT CHECKING HOW HOT THEY ARE FIRST! THEY CAN GET HOT ENOUGH TO GIVE BAD BURNS!!!
(Yep, learned that one the hard way, many years ago)
I just finished cleaning up my front calipers - a job I'd done because after I replaced my tyres I noticed that the right-hand disc was getting hot and the left-hand disc wasn't.
I'm pretty happy that the brakes are in good condition but...
If I lift the front and spin the front wheel, giving it a good heft to spin it, it rotates just one full rotation. And I can hear a bit of rubbing.
Without that calipers fitted it does many rotations and is silent so I'm happy with the bearings.
On a good-distance run, finishing with some slow riding through town, when I stop the front discs are a similar temperature - warm to the touch but no where near hot enough to be uncomfortable to hold on to. On a faster run they do get hotter but still not so hot that I can't hold my fingers against them.
But I'm surprised that there is so much drag. Is that normal?
At the end of the day, it's the temperature of the discs that are the indicator if there's too much drag but I would expect the front to be a bit free-er.
Also, my rear disc gets hotter than the front discs. That's weird too, isn't it? I just put HH sintered pads in but that wouldn't explain the rear getting hotter than the front, surely??
34
« on: 27 October 2018, 03:25:36 pm »
So the Sealy piston removal pliers arrived yesterday and I did my right-hand caliper today. I ended up using the rag-strip technique to clean the pistons all round (gave up using a brush as the rag worked better all-round), then pushed the pistons outs a bit to get to the strips that were hidden inside the caliper but outside of the seals, if you see what I mean. I then buffed up the bits of the pistons that I could see and then used to pliers to turn them round to buff up the bits of the pistons that had been hidden in the small-clearance section. Happy with that - I could see the pistons were in good condition and shiny-clean all round before I pushed them back in.
Cheers robbo - top bit of kit.
35
« on: 27 October 2018, 03:18:07 pm »
Well, I got a pair of the Metzeler Roadtec 01 tyres fitted a few weeks ago and yeah, like them. The most remarkable thing about them is that they felt so good from mile zero - like, as soon as I put the wheels back on they felt planted with good grip. They did feel a little bit high (increased ride height) but that might have been my imagination. Or maybe my old tyres were flat, ha!
One thing I have found very nice is that they seem to complain in a very civilised manner when they're pushed hard. In a straight line under very heavy braking the front starts to slowly shimmy/weave when it's getting overloaded which puts a smile on my face. And coming out of corners the back also gives a little squirmy warning that says it thinks it's working hard enough, thanks.
So yeah, happy with them. Now if they'll just do 20,000 miles that would be great...
37
« on: 25 October 2018, 07:25:30 pm »
I got a renewal from Bennett for nearly £300 so I shopped about and got more-or-less the same cover from MCE (via Compare The Market) for just over £100.
The day my insurance ran out Bennetts then emailed me to say they could do me cover for £85.
Well, if I do go back to Bennetts in the future I know what I'll be doing - letting it expire to get the 70% discount!
38
« on: 24 October 2018, 01:38:13 pm »
Just done my calipers using the rag technique, and it did the trick perfectly 👍
Get it in the top tips as a sticky!
Excellent - glad you like it ;-) I'm happy to do a proper write-up... but don't know where to put it... or how to make it sticky - is that an admin-only thing? The forum could do with a non-model-specific section coz stuff like this applies to all Fazers (and all bikes), not just the 1000.
39
« on: 23 October 2018, 06:48:16 pm »
A useful tool if you maintain your own brakes, is a set of Sealey VS1806 Brake Piston Removal Pliers, cheapest I've seen is £12.50 from Tools4Trade. These would allow you to turn the piston during maintenance/cleaning etc, so the entire leading edge surface can be visually checked.
On order! Cheers robbo I'll turn the pistons to clean them and use the rag-thread technique to clean all the crap out of the gap between the piston and the caliper. Job's a good 'un!
40
« on: 22 October 2018, 10:57:17 pm »
I've gotta share this coz I'm dead chuffed with how well it works!! Maybe it's well-known already but I'd never heard of it so here goes.
I was cleaning up my front brake calipers coz the right-hand one had started to drag a bit. Haynes has its usual text - push the pistons out a little and clean the edges up so you don't push any crap back under the seal when you push the pistons back inside the caliper. But while you can get to most of the piston edges, on some parts the clearance between the side of the piston and the caliper body is minute - maybe less than a millimeter. My brush sure wouldn't go in there! And there was plenty of crap that needed shifting. I couldn't rotate the pistons either. The technique I used was this:
Get some thin material (mine was an old shirt). Tear off a strip about 5mm wide. Use brake & clutch cleaning fluid. Thread the strip of material into the gap and work it back-and-forth round the piston. That's it - works a treat. Cleaned up the piston and the caliper body around it. Pistons pushed back into the caliper a treat. Lovely jubbly.
So like I said, maybe everyone does this already but hey, if not, give it a go next time.
41
« on: 04 October 2018, 11:29:26 am »
Getting some Roadtec 01s fitted tomorrow. Looking forward to finding out if they live up to the hype.
... and did they?
42
« on: 16 September 2018, 07:03:35 pm »
I fancy having a bit of a paint job done - nothing too complicated but maybe incorporating a Union Flag or something like that. The bike is currently blue and I'd want the whole thing re-painted to a much darker colour scheme - mostly black/grey with maybe some other dark colour.
Any recommendations in the Suffolk area? Any examples you wanna post to inspire others considering it?? Typical prices?
Cheers,
Dave
43
« on: 01 May 2018, 10:14:01 pm »
The Mounting plate can wear on the inside and can cause side play and a bit of noise, however it does not effect the operation of the valve. Mine is worn enough and has a ridge, but works fine. (40000miles). Last time mine was rattling it was because I had to much slack in the cables.
The bush in the mounting plate is very easily removed, but be aware it is pushed out from the inside. I remove them using a vice and either 9 or10mm socket (cannot remember which) on the inside and a 21 mm on the outside. Bushes are around £45 each. It will do no harm to replace it. The plate is around £125
D'Oh! Too much slack in cables - that'll be the first thing to check then! Thanks, I should have thought of that. Haynes specification says 1.5mm cable free play (but not how it's measured) but the text says half a turn on each of the adjusters - I guess it's just a matter of finding the sweet spot really.
44
« on: 01 May 2018, 08:44:58 pm »
What mileage is on the bike?
37,000
45
« on: 01 May 2018, 08:26:34 pm »
Ah! So there's a curious thing...
My valve was noisy (rattly) and one of the the pulley plate bolts had sheared so I put in to the mechanic. He replaced some collars, a bush and a housing and adjusted the cables and charged me loads of money.
The valve did sound much quieter.
But the cables had been adjusted 30 degrees too far anticlockwise (valve closed). I adjusted them correctly. Now the bike is exactly as loud as it was before.
Adjusting the valve too far closed quietens it right down.
I wonder how many mechanics do that instead of servicing it...
So, my next question to the good folks of this forum - what should I do to quieten my valve down?
If what the mechanic has told me is true then he has already replaced the bush on the opposite side to the pulley. He didn't replace the bush on the pulley end because they was so much more expensive as you have to get the whole pulley plate, apparently. Obviously, I could replace the pulley-end bush/plate assembly now. How do I test whether it's out of service limits? Just measure the free movement, I guess.
The vale is only noisy when pulling away from a bend/roundabout at low road speed and low engine speed - my gut tells me that it might be end-float due to the bike being lent over. Yeah, sure, centripetal force should cancel the lean out but still there could be an end-float issue, right? Anyway, there's only three places it could be rattling - in the two end bushes and end-float. How would I measure end-float? Is it adjustable? I guess I can just bang in washers to take up and slack if there's no approved method...
Any advice much appreciated.
I'll not be taking it back to the mechanic I used before!
46
« on: 29 April 2018, 12:35:42 pm »
I had the same experience with my mechanic. After my exup value was stuck he freed it all up and felt a big difference in performance, but having read about peoples experiences with the adjustments , I looked at mine and found that first the cables were not at the correct tension a bit lose but no 7k problem and the valve was in the wrong position using Pats method. I fixed best I could and the performance increases again.
I went to see the mechanic but sadly he tells me he has been fixing bikes for 35 years and has been adjusting Fazer exup value since the beginning and does not need to read the manual as he can work it out for him self and does not think it is good to have the cables to tight, and did not appreciate me telling him how to do his job.
Very sad has he otherwise did a good job at a good price and I trusted him to do a good job
I know they're extreme examples but many years ago a friend of mine collected his bike after having the front tyre replaced and after 100 miles or so the front brake caliper fell off. My uncle collected his car and drove it away and found out too late that they'd drained the old oil and not put any new in... I've never done anything like that when I work on my own vehicles... you say "I fixed best I could" - better than your mechanic or my mechanic did it...
47
« on: 28 April 2018, 05:10:49 pm »
You are correct Roxburd, I also thought that the instruction in all manuals are a bit unclear.  Even though Pats Site does state the on/off it is easy to get mixed up in the on off and running the engine, the kill switch method is just that bit more foolproof. Even though Pats Site does state the on/off it is easy to get mixed up in the on off and running the engine, the kill switch method is just that bit more foolproof. 
If it is going to take a bit of time getting the adjustments correct it is advisable on the 2003 onward models and US imports to pull the plugs on the headlights to save the battery. Just don't forget to plug them back in when finished. Very important also is to allow sufficient slack on the cables.
I've finally found a use for the kill switch after 30 years of riding! Cheers! I got the cables all adjusted correctly this morning and everything seems tickey-boo now - just need some decent weather so I can give it a proper test!
48
« on: 28 April 2018, 05:07:33 pm »
This is from Pat's site that I linked to earlier, it's quite explicit in stating that you should turn the ignition on and then off to allow for the servo to move the valve to the correct location before making any adjustments;
Underneath the cover is the Exhaust Valve pulley. It is controlled by two cables. The free play in each cable should not exceed 1.5 mm (0.06 in.). That 1.5 mm is free slack, movement without any pressure at all, not as far as you can push it. Mine were very loose. The 'fork' in the pulley should line up over the hole as shown. If it does not then it may be 30 degrees or more advanced. Turn the ignition ON then OFF. The pulley fork should now be aligned over the hole. If the pulley is not lined up over the hole then the cables are very likely improperly adjusted beyond the tension adjustment. You should loosen both cables until you can manually rotate the pulley until it lines up over the hole (see below how to loosen the cables.) You should do the ignition ON then OFF sequence again to make sure the servo motor is properly zeroed. Then proceed with the tension adjustment.
Pat's guide is fantastic - a great guide, well written with great photos. Whoever Pat is, thanks for the info, really.So I followed it - I turned the ignition on and the servo would move the pulley from 20 degrees ANTI-clockwise of the start position even further anti-clockwise against the valve's end-stop. The guide doesn't mention this. As I didn't know what the 'self-test' was supposed to do I didn't know if this was correct behaviour or not. The guide isn't clear on this specific aspect - it says "Turn the ignition ON then OFF. The pulley fork should now be aligned over the hole." Where should it start? Which way should it turn? Does it just go directly to the start position? I expected it to do a fuller end-to-end test to really check the valve can move freely throughout the range, not just move directly to the start position. Was this the cables 'improperly adjusted beyond the tension adjustment' (no, it wasn't) or was it a sensor failure or a failure in the controller?The 'self-test' is actually just a reset to the start position with a fault signal if there's too much resistance. If the valve is already in the start position (as it would be if I stopped the engine with the kill switch then left it out on the rain in the back garden for 20 years) it doesn't even move at all - that's not much of a self-test really, is it? It's a great guide but if someone ends up in my position it's helpful to know the full picture, IMHO. It certainly helped me in my particular position - my cables weren't 'improperly adjusted beyond the tension adjustment' as Pat envisaged (and designed the guide for), they were improperly adjusted wide of the mark by 30 degrees by a mechanic who didn't know what he was doing.If you already know what it does or you're just adjusting your cables a bit then Pat's guide is obviously all anyone would ever need, right? But if anyone finds turning the ignition ON and OFF just makes things worse and the pulley is moving in the wrong direction then I hope this info might help them realise what's going on. I guess that's why Pat posted his guide too... we're addressing slightly different starting points though.
49
« on: 28 April 2018, 01:38:45 pm »
So here's some interesting info that I haven't seen full explained in the Haynes manual, the Yamaha manual or any of the online guides... I bet there's loads of Yamahas out there on the road with mis-adjusted EXUP valves because of this... The EXUP control system has *two* reference points - I'll call them start and idle: - the start position is where the valve should be when the engine is being started up. - the idle position is where the valve should be when the engine is idling. 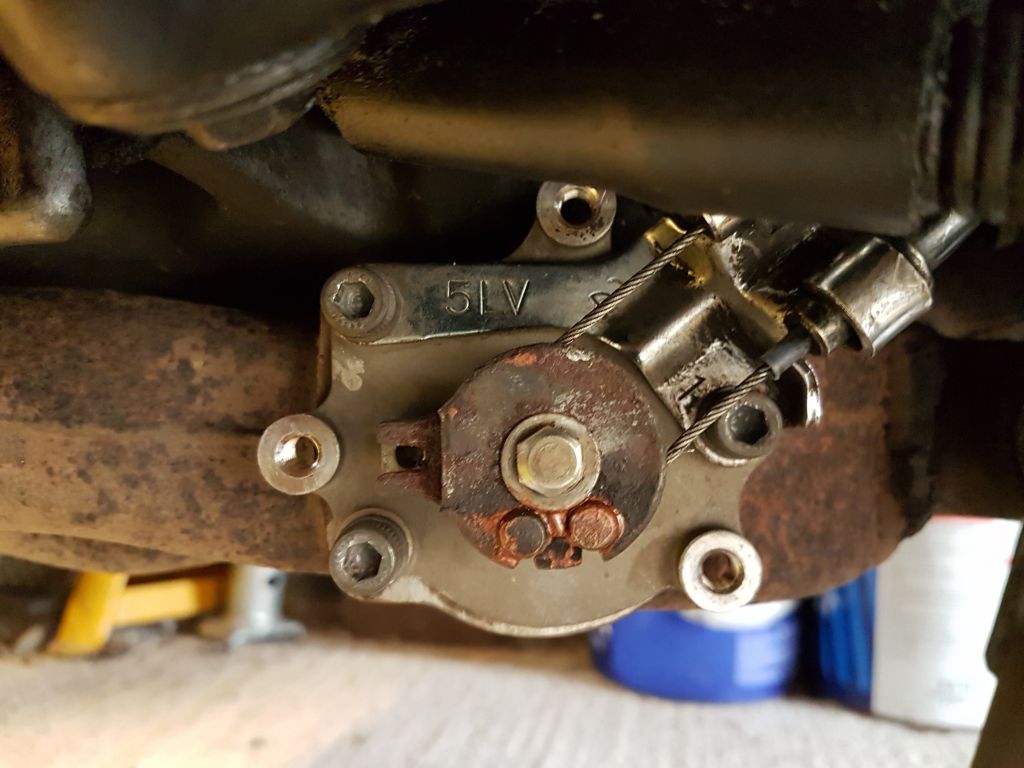 The start position - fork directly over hole. 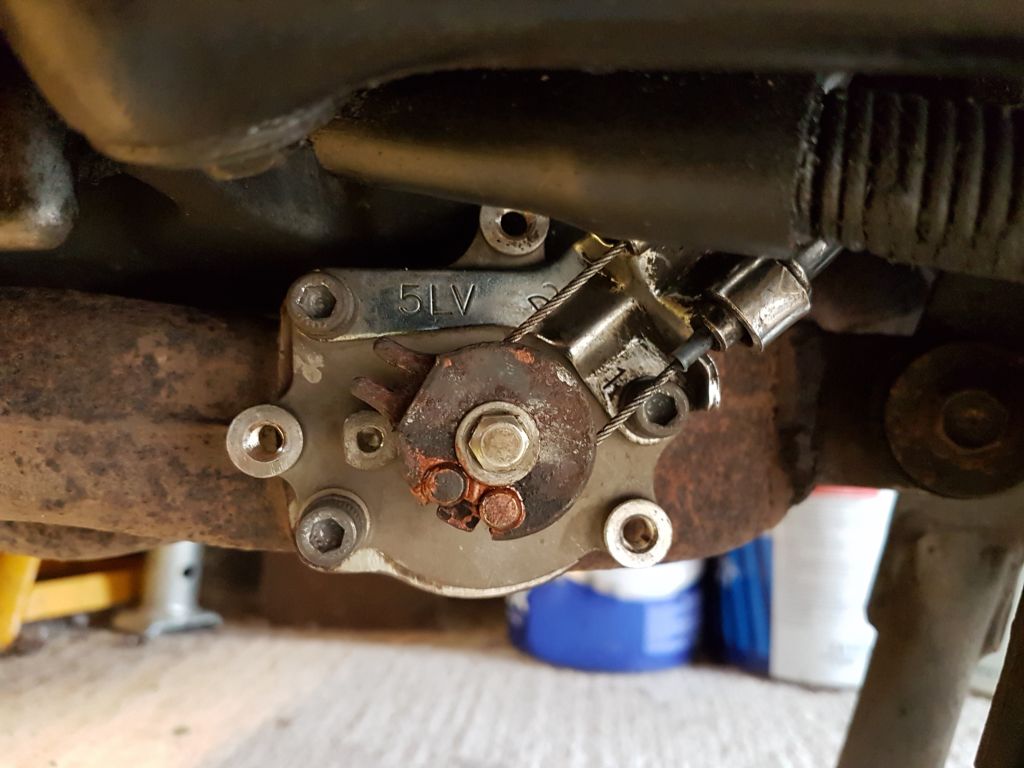 The idle position - valve rotated (clockwise / opened) 30 degrees. Here's the tricky bit - the valve should be adjusted to the start position but the EXUP control system only returns the valve to the start position when the ignition is switched on and the engine is not running. And when the ignition is switched on the control system 'self-test' only returns the valve to the start position - it doesn't do any other full-deflection type of test movement. So if the valve is already in the start position it does nothing at all. It's not much of a self test really. So, if you stop the engine by use of the run/kill switch or stall the engine the control system will zero the valve to the start position. But if you have the engine running and switch the ignition off the control system is powered down immediately and the valve is left wherever it was (probably in the idle position). This is what my mechanic had done - the control system left the valve in the IDLE position and he'd then gone and adjusted the valve to the START position with the fork over the hole - 30 degrees retarded. So my valve probably started off pretty well adjusted and the guy I paid to fix it adjusted it to 30 degrees more closed than it should be. Fortunately, it was so far retarded that when the control system tried to move it to the start position the valve actually hit its end-stop and wouldn't go far enough and the control system threw the 7k signal, other wise I'd have never known. Yeah, that's why I prefer to do stuff myself... So, basically, all the instructions I've seen are incomplete or at least unclear - it is essential to have the ignition on for a few seconds without the engine running so the control system can set the valve to the start positon before you do the adjustment. unfazed - you were right - gotta use the kill switch, not the ignition. When I see 'hit the kill switch' I tend to just switch the ignition off automatically but in this case it's gotta be the kill switch!
50
« on: 27 April 2018, 12:37:53 pm »
Sounds like its not adjusted properly, start the bike let idle for a few seconds, hit the kill switch and see where the pulley returns to. It should come to rest with the fork of the pulley over the hole, if not adjust it with the inline cable adjusters under the tank.
Ah, right, will give that a go this eve!! Thx @unfazed
|
