Date: 28-04-24  Time: 01:22 am

Author Topic: Project Ruby Racer (custom FZS600)  (Read 69339 times)

Ruby Racing

  • Club Racer
  • ****
  • Posts: 448
    • Main bike:
      FZS600 98-99
    • - Kawasaki ZRX1200R
    • View Profile
Re: Project Ruby Racer (custom FZS600)
« Reply #75 on: 19 May 2014, 12:32:39 am »
I know, I know. Sorry. Got some stuff to post. Been in England last week doing 4 track days!


All went well until the last one at Angelsey when I cocked up, ran wide onto grass, kept it upright and was heeding back to the tarmac when another rider appeared and we were on an intercept course. Rather than take us both out I hit the back brake and went down fast and hard. Engine case hit the high point of the kerb and cracked the case dumping the oil! Still, just me involved. Just got a couple of bruises and a Daytona 675 to fix now!  :o
Feel the Fear and do it anyway!

Read about my Project Ruby Racer - FZS 600 Custom build Click this link > > > http://foc-u.co.uk/index.php/topic,10613.0.html

Ruby Racing

  • Club Racer
  • ****
  • Posts: 448
    • Main bike:
      FZS600 98-99
    • - Kawasaki ZRX1200R
    • View Profile
Re: Project Ruby Racer (custom FZS600)
« Reply #76 on: 20 June 2014, 09:39:06 pm »

Sorry for the delay. Here's the next instalment.

Day 44 - 3-4-14 - Got the third design of speedo bracket made and mounted using the holes for the ignition key. That's much neater and will allow the speedo to mostly be hidden behind the number board.
Don't take any notice of the finish of the bracket, it's just a work in progress. Once I've nailed the design and location I'll be making one that looks a lot better.


Day 45 - 18-4-14 - Stuck in a bit of limbo at the moment waiting for the sprockets to be made and the design for the rear brake caliper bracket. So I had a look at the swing arm. It doesn't have mounts for
paddock stand bobbins, so I needed to find a solution. I still had the first swing arm I bought that has an axle adjuster bolt stuck in and sheared off, so I used that for practice.


I drilled a hole in the small flat area near the axle adjust bolt hole, then tapped it with the appropriate thread size. It will need a small spacer to be made to clear the weld, but seems to work OK. I don't anticipate having
clearance issues with the axle as that should be mounted pretty much all the way back as this EXUP swing arm is slightly shorter than the Fazer one and also the front forks aren't as offset as far as the Fazer ones, so I'll
probably need as long a wheel base as possible to maintain stability. And a steering damper just in case.


I want to mount that under the forks but I don't think it will fit. So I may have to resort to mounting it at the front of the tank like a Ducati 916. Although I'd rather it was hidden away for a cleaner look.


I made an additional bracket for the GPS lap timer. I much prefer this new location as it lines up with the speedo and hides the power cable for the lap timer behind the speedo.


I have been having a bit of a saga trying to get some rear sets fabricated. I approached Race Spares Direct before Christmas to see if they could make me some, as I saw their rear sets on eBay and I really liked the style: a
very simple and clean look. At about 115 quid they were good value. Plus I like to support smaller businesses if I can. They said they could after Christmas.


To cut a long story short I tried to get back in touch, but my emails wouldn't get replied to. I know they were receiving them as I contacted them using another email address and got immediate responses. I also tried telephoning
countless times and just got the same thing, nobody would answer. I guess they changed their minds about making them. If so I would rather just be told that. Extremely disappointed I looked at my other options.


Looking at other rear sets I realised that those for a Suzuki GSX-R1000 K5/K6 were very similar in set up with regards to the gear lever connections and the brake master cylinder location. I picked up some secondhand OE rear
sets from a race forum I frequent and set about mounting them.


I wanted to have them in the same place as OE, with the option to mount them higher and further back. So made a bracket with four holes in so I could move them around. This didn't work because of clearance of the heel plates
on the swing arm. The brake side was the worst for this. I was trying to use the existing mounts on the frame, however after much head scratching I decided to do away with the brackets and mount the rear sets direct to the frame.


I will need new mount holes welding on for this. I'll have them about 20mm higher than OE and slightly forward of standard. This shouldn't be an issue as I have dodgy knees! Also if I can pick up some Crescent or Pro Mach
(who I'm pretty sure make them for Crescent) then I will get that adjustability.


I've bought a couple of cans. The stubby Gianelli I mentioned before and a Quill that I had planned to cut down, before I got hold of the Gianelli.


Day 46 - 7-6-14 - The Talon sprockets arrived a week ago and I'm happy to report they fit well and appear to line up perfectly. Always a relief when you get your measurements correct. Had a bit of an issue
removing the rear sprocket from the KTM sprocket carrier. You undo them on the rear side using an Allen head. The sprocket side has a flat edge to stop it turning when tightening it up.


I couldn't for the life of me work out how to undo them. I eventually used two old clip ons held in a vice and then slid the sprocket down onto them to stop it turning. This did the trick. But how would I do them up with the
new sprocket as I couldn't use the same method. Then I realised what a numpty I'd been. I just needed to hold two of the mount bolts in the vice and tighten from underneath. I was obviously only thinking in one dimension!


Got some potentially brilliant news on the rear brake caliper front. My mate Shaun spotted a rear brake caliper bracket for a Laverda 750 Formula on eBay and it looks exactly the right dimensions for my build. Fingers crossed
I win it and it works. Will save me about 230 quid if it does as I won't need to get one custom made. WooHoo! I won it. I was the only bidder and got it for the start price of 20 quid.


I was in my local bike shop yesterday and they happened to have a second hand Laverda 750 Formula for sale. Talk about coincidence, as I don't think they are that common a bike. Had a good look and took a couple of photos
and even more convinced it will work.


Day 47 - 17-6-14 - The caliper bracket arrived and excellent news it fits perfectly! It was designed for the caliper I want to use and it clears the disc. Forgot to check the pads are in the correct place on the disc.
I need to make yet more spacers to make sure it's in the right place. I have no access to the college now, so I'll need to farm the job out.


The bolt for the torque arm only just sticks out the other side of the mounting point, so no way you can get a nut on it. Hopefully the bolt will come out easily and I can either fit a new longer bolt, or just use the thread in the
bracket to accept a bolt from the torque arm.


Feel the Fear and do it anyway!

Read about my Project Ruby Racer - FZS 600 Custom build Click this link > > > http://foc-u.co.uk/index.php/topic,10613.0.html

Ruby Racing

  • Club Racer
  • ****
  • Posts: 448
    • Main bike:
      FZS600 98-99
    • - Kawasaki ZRX1200R
    • View Profile
Re: Project Ruby Racer (custom FZS600)
« Reply #77 on: 20 June 2014, 09:53:14 pm »
Very kind. But lets wait and see if it actually works!


Glad you like the pictures. Much easier than words and making pictures happens to be my day job.
Feel the Fear and do it anyway!

Read about my Project Ruby Racer - FZS 600 Custom build Click this link > > > http://foc-u.co.uk/index.php/topic,10613.0.html

MarkWales

  • Club Racer
  • ****
  • Posts: 250
    • Main bike:
      FZS600 98-99
    • View Profile
Re: Project Ruby Racer (custom FZS600)
« Reply #78 on: 20 June 2014, 10:31:25 pm »
coming along with amazing pace

Ruby Racing

  • Club Racer
  • ****
  • Posts: 448
    • Main bike:
      FZS600 98-99
    • - Kawasaki ZRX1200R
    • View Profile
Re: Project Ruby Racer (custom FZS600)
« Reply #79 on: 20 June 2014, 11:04:32 pm »
coming along with amazing pace


Seriously? I think I'm dragging my heels a bit. Work does tend to get in the way!
« Last Edit: 21 June 2014, 12:50:36 am by Ruby Racing »
Feel the Fear and do it anyway!

Read about my Project Ruby Racer - FZS 600 Custom build Click this link > > > http://foc-u.co.uk/index.php/topic,10613.0.html

ChristoT

  • Alleged Foc-u Daphnis & Chloe expert
  • GP Hero
  • ******
  • Posts: 5,207
  • Fluent in English, French and bullshit!
    • Main bike:
      FZS600 98-99
    • - Saab 9-3, caravan, hang glider
    • View Profile
Re: Project Ruby Racer (custom FZS600)
« Reply #80 on: 21 June 2014, 12:25:18 am »
It's looking fantastic! And certainly going faster than my project!  :rolleyes
The Deef's apprentice

MarkWales

  • Club Racer
  • ****
  • Posts: 250
    • Main bike:
      FZS600 98-99
    • View Profile
Re: Project Ruby Racer (custom FZS600)
« Reply #81 on: 21 June 2014, 10:06:55 pm »
Maybe I am comparing the progress to home quickly others are moving

Chris

  • GP Hero
  • ******
  • Posts: 1,982
    • Main bike:
      FZS600 02-03
    • View Profile
Re: Project Ruby Racer (custom FZS600)
« Reply #82 on: 17 September 2014, 06:07:28 am »
Sooo... any updates??  :D

Chris

It wouldn't be fun if it was easy, I just wish it wasn't this much fun.

Ruby Racing

  • Club Racer
  • ****
  • Posts: 448
    • Main bike:
      FZS600 98-99
    • - Kawasaki ZRX1200R
    • View Profile
Re: Project Ruby Racer (custom FZS600)
« Reply #83 on: 17 September 2014, 09:11:29 am »
Soz! Yup, almost finished the latest instalment. Coming to a web forum near you very soon. Promise!


And I'm liking your enthusiasm.
« Last Edit: 17 September 2014, 09:12:01 am by Ruby Racing »
Feel the Fear and do it anyway!

Read about my Project Ruby Racer - FZS 600 Custom build Click this link > > > http://foc-u.co.uk/index.php/topic,10613.0.html

Chris

  • GP Hero
  • ******
  • Posts: 1,982
    • Main bike:
      FZS600 02-03
    • View Profile
Re: Project Ruby Racer (custom FZS600)
« Reply #84 on: 17 September 2014, 01:58:44 pm »
Just really enjoyed this thread mate and the bike is going to be awesome when it's done. Wish I had the skills to do something like this. All I can do is make things super clean. haha

Chris

It wouldn't be fun if it was easy, I just wish it wasn't this much fun.

Ruby Racing

  • Club Racer
  • ****
  • Posts: 448
    • Main bike:
      FZS600 98-99
    • - Kawasaki ZRX1200R
    • View Profile
Re: Project Ruby Racer (custom FZS600)
« Reply #85 on: 17 September 2014, 09:39:06 pm »


I hope you're right and it is awesome. I'm keeping my fingers crossed! And you do have the skills, anybody does. You just have to have a go and learn on the job as it were. I'd never used a lathe before starting this project. I'm certainly not now an expert, but I can knock up some basic spacers. You just have to take your time and think things through.
Feel the Fear and do it anyway!

Read about my Project Ruby Racer - FZS 600 Custom build Click this link > > > http://foc-u.co.uk/index.php/topic,10613.0.html

Ruby Racing

  • Club Racer
  • ****
  • Posts: 448
    • Main bike:
      FZS600 98-99
    • - Kawasaki ZRX1200R
    • View Profile
Re: Project Ruby Racer (custom FZS600)
« Reply #86 on: 18 September 2014, 11:27:37 pm »

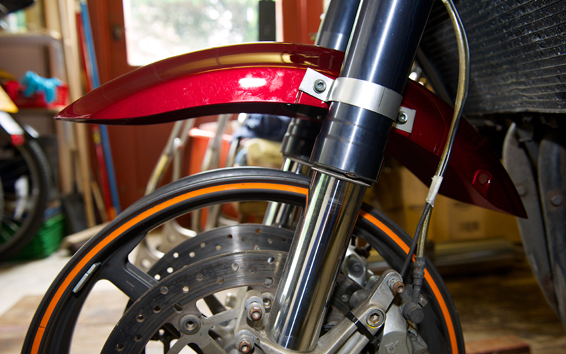
Day 48 - 27-7-14 - Had a go at making some brackets to mount the front mudguard (from a Kawasaki ZRX1200) to the fork tubes. Seemed to work OK however I am doubtful that they would stay
in place once on the move and I'd worry about the mudguard dropping onto the tyre. As I need to protect the fork tubes from damage I need to make some protectors for them anyway, so I think I'll combine the
two into one item. The protector parts will follow the same design as the mudguard a sort of boxy shape with rounded edges so the whole thing works together.


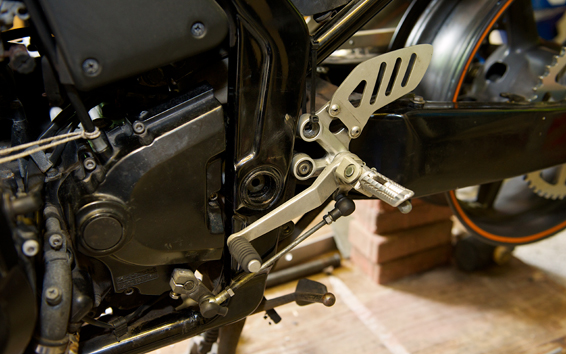
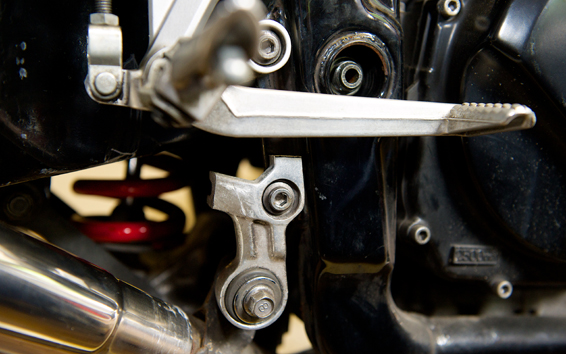
I've temporarily fitted the GSXR-1000 K6 footrests using the existing mounting points on the frame, with the lower hole of the footrests in the top hole of the frame mount. The top hole is held in place with
cable ties and is just for a shakedown run of the new front and rear ends. This makes the footrests about 20mm higher than standard and also moves them forward slightly, which will be kinder to my knees!
You may remember I came to this solution as the other positions I tried hit the swing arm.


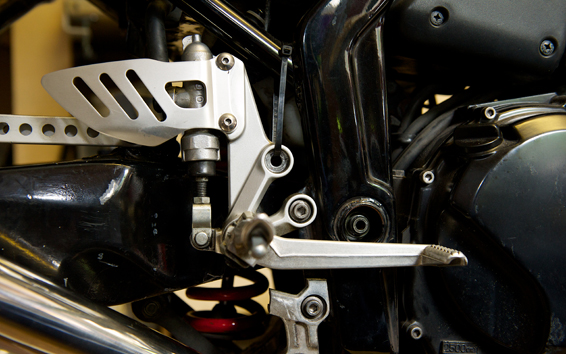
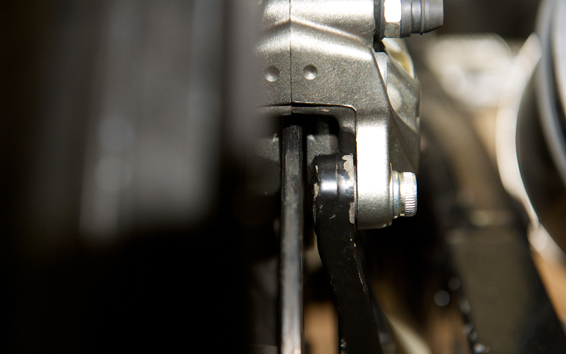
I cut the exhaust mounting bracket from the OE footrest. Not quite sure how I'm going to solve that problem. I may file down this part to make it look nice, or fabricate something myself. Still mulling that
one over in my head.


The clearance between the silencer and the swing arm is a little close, so not too sure if that is OK or not.


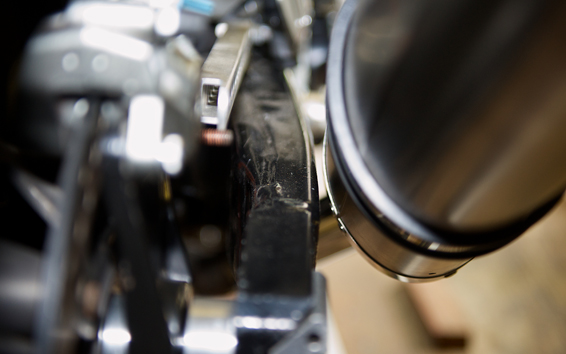
Got my new spacer made and now the caliper is central on the disc.


Day 49 - 7-8-14 - 
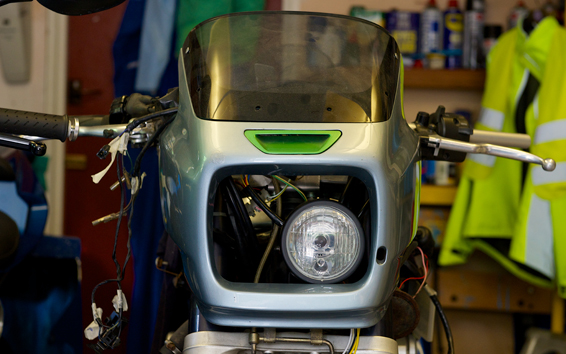
Made a bracket to mount the headlight. It's the smallest conventional bulbed light I could find and is only 90mm in diameter. Unfortunately it's a little deeper than I would like.


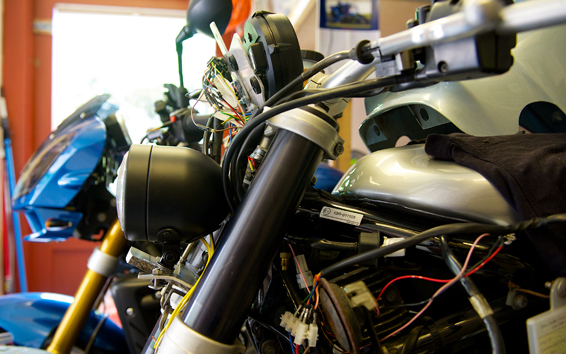
I had hoped to fit one light that would work with either the ZRX fairing or the number board.   It's fine with the ZRX fairing as you can see, unfortunately it would make the number board sit too far away
from the forks to look right. So I may have to look again at a light from a B Whiz scooter.


Day 50 - 9-8-14 - 
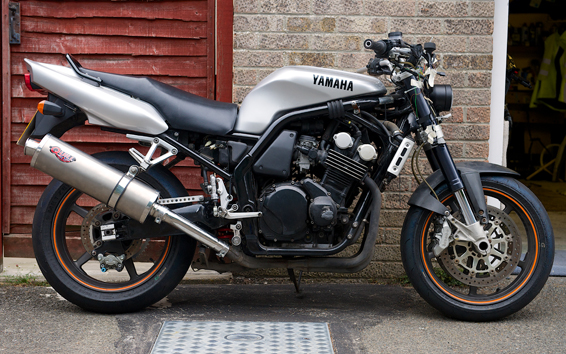
Finally got the rear wheel spacers sorted and everything is in line. So time to get the tyres back on and the bike rolling again. Took her outside to have a look at things.
Unfortunately the back end sits very low. Took a couple of minutes to realise I needed to change the length of the dog bone links on the shock absorber. But why?


I was sure the swing arm was the same dimensions as the OE one. I still had the OE and knackered EXUP swing arm so I compared them closely. I could see that the EXUP linkage mounting holes were
lower than the OE ones and when I did a rough measure it was lower by about 23mm.


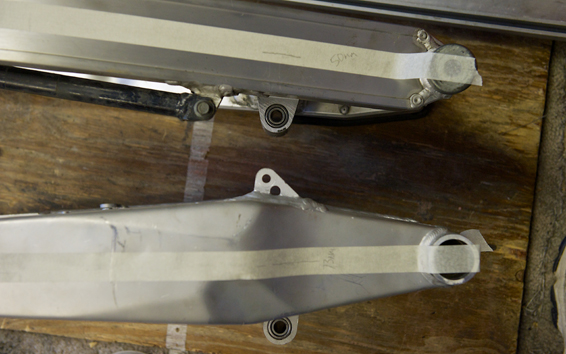
The bolt hole centres of the standard dog bones are 140mm apart, so I knew I needed to make some shorter ones. I can't remember where I got the figure from, but I went for 115mm between linkage
bolt hole centres. This raised the rear although when on the centre stand the rear wheel sat on the ground. So I thought this was too low.


Tried again with a distance between linkage bolt hole centres of 130mm. This looked too low again. However with the new forks the front end may be riding a little higher than standard.


Day 51 - 17-8-14 - It was obviously somewhere between 115mm and 130mm. I tried to work it out mathematically using measurements between the three holes for the linkage and came up
with a figure of 127.5mm. I decided to round that down to 125mm. The rear tyre only just touches the floor, so I'm getting closer. I'll try 120mm next. I should have taken a measurement of the seat height
before ripping the standard bike apart. Too late now. Looking on line and the Fazers seat height is quoted as 790mm, so I'll see how close I can get to that.


As I was using the standard dog bone when fitting the rear sets the swing arm was too high and hitting the rear sets easily. Now that I am close to getting the swing arm at the right height it will hopefully
mean I have a bit more room to play with with the foot rests and so I might be able to revisit my plan for adjustable rear sets.


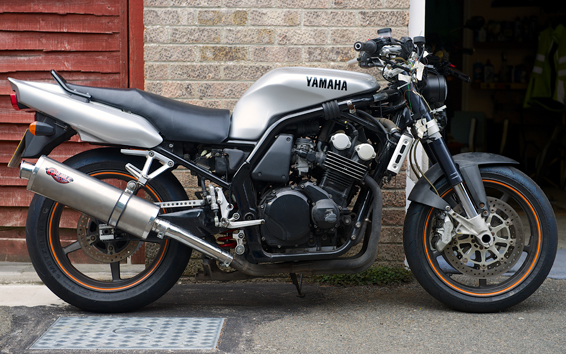
Pic below is with the 120mm dog bone.


Day 52 - 13-9-14 - 
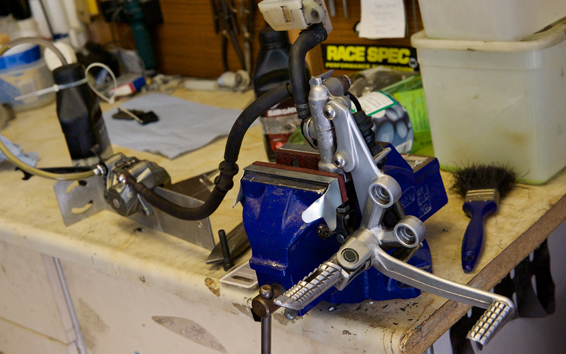
Time to get the bike safe to ride again. I'd bought a used rear brake hose for a fiver so I could join up the GSX-R1000 K5 master cylinder/foot pegs with the Brembo caliper.
It was difficult to bleed it on the bike as it's not properly attached, so I put the master cylinder in the vice and put a couple of bits of metal between the brake pads.


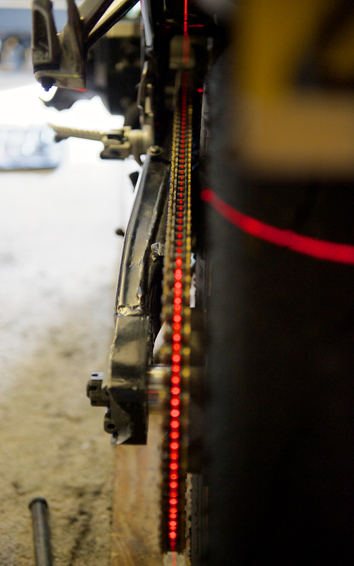
Whilst I still had my mates laser (thanks Shaun, will return it soon!) I double checked the chain run. All seems good there.


I had a good once over of the various nuts and bolts I've had undone and with tape holding the wires in for the speedo (not that the speedo part works at this stage!) and the ignition barrel taped to the
top of the fuel tank, she was ready to roll again. I did a couple of runs in my lane to make sure the brakes were working, then it was out onto the open road.


All seems good. The motor is nice and smooth, the front Brembos are really nice and powerful. The forks are nice too, although bear in mind I have to stick to a 40mph island limit, so not really challenging
them! Plus it's just a little shake down to see if the front and rear end work OK. Couple of niggles at this point. The KTM yokes have less offset, if that's the right word, possibly I mean less trail compared to the
OE Fazer yokes. This means the yokes hit the radiator with hardly any turn of the handle bars. That severely limits the turning circle.


Couple of solutions spring to mind. One is to get new yokes fabricated, however that's going to cost a few hundred quid, so not keen on that. I might be able to lower the radiator so the yokes can turn more.
Any thoughts anyone?


The other issue is a loud whine which increases with speed. I put the bike in neutral and it still does it and appears to be coming from the rear wheel. As I have brand new bearings in the wheels I doubt it's those.
There is a bearing in the brake caliper bracket, so it could be that. There is also a massive bearing in the sprocket carrier and I think it's that.


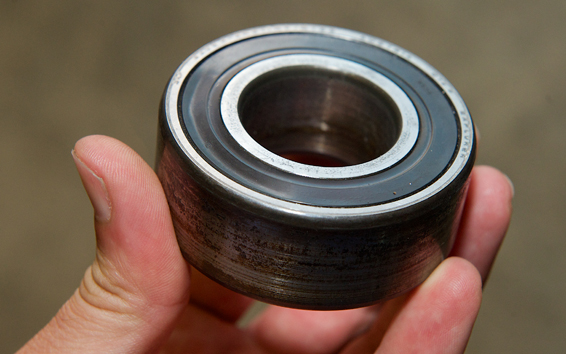
There are spacers that sit inside this bearing and I copied the dimensions of the OE spacers when making my spacers. They are a tight fit and took some banging to get in. And then a lot more banging with a
hammer to get them out again. So tight was the fit that I actually knocked out the bearing in the process! As you are only supposed to hit the outer race of a bearing I suspect I've knackered it. I've ordered a
new one which unfortunately was forty quid. That'll teach me.


The foot pegs seem a little high and too far forward, so I my need to rethink this. At the moment they are about 20mm higher than standard and about the same distance forward from OE. Doesn't seem a lot,
but feels it. I can either move them around and possibly they will have to move back a little, or when I come to do the seat I can raise the seat height. As it stands the seat seems quite low as I can get my feet
on the floor easily, much more easily than any of my other bikes, so maybe raising the seat height will be OK. I'm just wary of changing the OE set up too much as I don't want a bad handling bike at the end of it.
Another thing to ponder.
Feel the Fear and do it anyway!

Read about my Project Ruby Racer - FZS 600 Custom build Click this link > > > http://foc-u.co.uk/index.php/topic,10613.0.html

Ruby Racing

  • Club Racer
  • ****
  • Posts: 448
    • Main bike:
      FZS600 98-99
    • - Kawasaki ZRX1200R
    • View Profile
Re: Project Ruby Racer (custom FZS600)
« Reply #87 on: 15 November 2014, 01:00:53 am »

Day 53 - 19-10-14 - Changed the massive bearing in sprocket carrier for a new one. Test rode and seems better, but a while since I rode it so not sure. Still a whine, however think that is the transmission.
Had another look at making adapter plates for my Suzuki rear sets. After much head scratching came up with a design. So will have a go at making them.


Day 54 - 22-10-14 - This was my idea for a different mounting bracket for the rear sets. I was trying to hide the mounting point on the frame to make it look like part of the frame. The bolts attach from
the back side of the frame, screw into the frame and then into the bracket. This is not an ideal solution as the head of the bolt doesn't pull the bracket towards the frame. Rather that job is being done by the thread.
Anyway even though it's just a very rough mock up I didn't like the look of it. Next!


Day 55 - 2-11-14 - Another idea came to me. Make my own brackets and attach the Suzuki foot pegs and levers to them. So I designed this.


I've also dismissed that idea as I don't have a milling machine (thinking about getting one though!) and I doubt I could get the kind of perfect finish I like. I thought back to my original brief to have the bike suitable
for racing. Ground clearance is important so the ability to change the position of the foot pegs for road or track appeals. As the OE Suzuki foot rests are almost in the right position I thought some aftermarket rear
sets would do the job.


I used to race a 2005 Suzuki GSX-R1000 and that was fitted with ProMach rear sets. They were very strong and I liked the design, so I set about trying to find some on that well known internet based auction site.
Not much on there, however I found a full set in very good condition and the furthest forward position was right where I needed the foot rest to be, with option of moving them up and back. Perfect. Not so perfect
was the price. Suffice to say I paid a bit over the odds. Preferable to relying on some unknown quality, cheap versions from China though. Plus after checking with ProMach direct I can still get spares.


Day 56 - 9-11-14 - As I mentioned previously when riding the bike there is a loud whine coming from the back end. I slipped off the chain and got the rear wheel spinning at a fast speed with the aid
of a drill fitted with a big sanding wheel working on the tyre. Without the chain there is no whine, so pretty happy the rear wheel bearings are not the problem. That leaves the chain and transmission. Seems quite
loud to be just the chain, so I'm going to try and work out how to spin the drive sprocket with the chain removed to see if the transmission is the culprit. I don't feel it can be the chain as it's brand new with all it's
original wax lube all over it.


I used to have a 2002 Yamaha R1 and that had a pretty noisy gearbox, so maybe it's a Yamaha thing. Any Fazer owners have noisy/whinny transmissions? Also thinking back to when I bought it, it had been involved
in a crash which holed the right engine case allowing engine oil to escape. It's possible there is some damage, although I was told be the previous owner it didn't run for long on it's side. Or maybe it's normal and
"they all do that sir".


I decided at the outset to do this build in stages to try and avoid getting too far in and finding things wouldn't work how I wanted. Stage one was to get the front and rear ends fitted. I've done that now, so stage two
 is to fit Venom (by Motad) header pipes, new silencer and individual pod filters on the carbs and get it running properly, or certainly in the ball park before proper setting up on a dyno. Stage three is when the angle
grinder comes out and the transformation proper starts.


So the carbs had to come out so I could fit different jetting and to check what size jets to order. There's always one nut, bolt or screw that causes an issue isn't there? It was the last of the Jubilee type clips on the
carb rubbers (engine side) to throw a spanner in the works. The screw holding the rubber tight to the carb would not budge and in the end I rounded off the screw head trying. Doh! All these intake rubbers were
perished so I was going to replace them anyway and had already picked up some second hand ones. Nothing for it but to resort to brute force and ignorance. Where's my hack saw? I just cut through the rubber
and after much jiggling got the carbs free.


Now to remove the airbox. Pretty sure I've read on the Fazer forum that you have to remove the engine to get the air box out. The engine will be out at some point, but not yet thanks very much. It did indeed look
like a non starter. However I noticed the front of the air box could be removed. So I did that and pulled the air box forward. My that is tight. Tried various angles of air box, but it looked like it was staying put. One last
try. I pushed the air box upwards and forward as much as possible and was able to get the rear right side to go in front of the frame rail. It was very tight and would probably scratch the frame
(it'll be powder coated eventually), but I managed to yank it out. So it can be done. Result.


Day 57 - 10-11-14 - Another screw put up a fight. One of the small screws that attaches the float bowl to the carb body. Only one out of the 16 however I managed got knock it off with a hammer
and a screwdriver. Not pretty and I've ordered a couple of new screws.


Tried to get at the slide needle as I'll need to change the height of it, however I wasn't sure how to remove this white plastic bit that sits at the top of the needle. Anybody any ideas please? I didn't want to get
tough on it in case I broke it.


The main jets are Mikuni number N102221 size, with 115 size fitted in all the carbs. I haven't got any experience with carbs, but I managed to get some information on new jetting from someone on the Fazer
forum who had got pod filters fitted. He had taken his bike to a dyno for set up and they fitted 125 mains in the outer carbs and 127.5 in the middle carbs, with all four needles moved to fourth groove down.


My ProMach rear sets arrived so I quickly mounted them. I didn't have time to check properly, but it looks like they are going to work. Happy with that.


The credit card got hammered today as I ordered parts to progress with the build. The exhaust is ordered from Motad. They are making another batch of 25 which should be done by 20 November 2014, so I
should get it the following week. Four pod filters with chrome covers (K&N part number RC-1824), the bigger mains jets, float bowl screws and  intake jubilee clip are on the way.
Feel the Fear and do it anyway!

Read about my Project Ruby Racer - FZS 600 Custom build Click this link > > > http://foc-u.co.uk/index.php/topic,10613.0.html

ChristoT

  • Alleged Foc-u Daphnis & Chloe expert
  • GP Hero
  • ******
  • Posts: 5,207
  • Fluent in English, French and bullshit!
    • Main bike:
      FZS600 98-99
    • - Saab 9-3, caravan, hang glider
    • View Profile
Re: Project Ruby Racer (custom FZS600)
« Reply #88 on: 15 November 2014, 01:22:26 am »
Those white bits just pull out. Be careful though, as if you're too enthusiastic, you fire a tiny and essential spring across the workshop! A few seconds of gentle care with needlenose pliars, and all will be well.

Looking good!  :)
The Deef's apprentice

Ruby Racing

  • Club Racer
  • ****
  • Posts: 448
    • Main bike:
      FZS600 98-99
    • - Kawasaki ZRX1200R
    • View Profile
Re: Project Ruby Racer (custom FZS600)
« Reply #89 on: 15 November 2014, 05:57:56 pm »
Thanks ChristoT. I thought that was how to remove the plastic thingy, just didn't want to chance it and break it. Done that enough time dover the years to know to go slower sometimes.
Feel the Fear and do it anyway!

Read about my Project Ruby Racer - FZS 600 Custom build Click this link > > > http://foc-u.co.uk/index.php/topic,10613.0.html

Ruby Racing

  • Club Racer
  • ****
  • Posts: 448
    • Main bike:
      FZS600 98-99
    • - Kawasaki ZRX1200R
    • View Profile
Re: Project Ruby Racer (custom FZS600)
« Reply #90 on: 03 December 2014, 12:31:22 am »

Day 58 - 19-11-14 - Worked on the carbs today and fitted the bigger main jets and moved the clip on the main needle down to the fourth (bottom) groove. Also had a good look at the new Pro Mach
rear sets I bought and they will do a perfect job. Took some time to get the gear shift linkage to the right length as I didn't want to go mad a make it too short.


Spent quite a bit of time just looking at the bike and working out where I'm going to package everything. It's going to be tight! Main things I'm working on are the ignition switch, steering damper, battery, relays,
fuses, starter solenoid and Igniter box (ECU).


Because I'm using the ignition mount holes to mount my clocks and there's no space left for the ignition barrel, I am thinking of relocating the ignition to the front of the top frame tubes just in front of the leading
edge of the fuel tank, or sunken into it. Going to be a bit of a clash as that's about the only place I can fit a steering damper (Ducati 916 stylee). However looking at the different mounts available it should be doable.
Just have to work out which other bike model I'll need.


Thought about placing the battery at the front of the fuel tank area as well. I'm going to have a carbon fibre fake fuel tank cover over an aluminium custom made fuel tank, so can leave some space near the
front for this purpose. However not sure if directly above the engine and cooling system is a wise place for a battery with regards to heat. Anybody have any thoughts on that?


Another possibility is mount it at the back of the fuel tank, near my gentleman's area. This might be a better option and possibly also means less rewiring as it would be near it's existing location. I should mention
that I'm going to relocate the subframe higher than standard and going for a very clean, empty area under the seat with nothing in it, hence the need to find new homes for things.


One of my purchases arrived yesterday: a Yamaha RD250 fuel tank. It will be too small for the job, however I'm going to use it as a mould for the carbon fibre cover. I'll make a copy then cut it in the appropriate
places to increase it's size, then make the final cover from that. Never done it before, so that's going to be a big learning curve.


Day 59 - 22-11-14 - My new Venom system arrived from Motad. I have to say I'm not overly impressed with it. The stainless steel finish is nowhere near mirror like, more of a bare aluminium type finish.
Which on it's own is OK, but clashes with the mirror finish link pipe I have. If you get one of these systems I'd recommend getting the Venom can to go with it so it all looks the same. To be fair I'm pretty sure they
have been built down to a price to compare with the cheep stuff coming out of China so it's maybe harsh for me to have a pop at the quality, it's just that being made in England I expected better.


The welding is rough and there is quite a bit of splatter which wasn't removed before plating. To be fair it's mostly in areas you won't see, like inside the header pipes and under the engine. I may get it ceramic
coated once the build is finished. They also sent me the wrong size exhaust gaskets (too big), however once I had advised them of this they sent the correct size which arrived the next day.


Day 60 - 25-11-14 - Got the pod filters fitted and the carbs back on.


The Venom system has a slightly bigger internal diameter than the standard system, so hopefully that will let it breathe easier.


Did some photos of the bike so I could do another mock up of the tail, fuel tank and fairing set up I want to use, so I could see if I can achieve the look I'm after. Below is my original mock up and below that my
latest mock up.


It's looking like I'm on the right track. However I don't like where I have the fairing sited as I feel it's too high and the tail, fuel tank and fairing don't flow into each other nicely. So I hit Photoshop again and
moved the fairing down. That looks better.


Day 61 - 30-11-14 - I've relocated the fairing in the lower position for real and feel it looks better as it covers the bottom yoke now. However it may move up a little as I haven't finalised it's position yet,
but it will be very close to where it is now. Moving it down means I had to move the headlight down too. In photo below the picture on the left is original position of the fairing, on the right the latest location.


This has had a benefit in another area, namely the location of the steering damper. Previously I'd thought about mounting it in front of the fuel tank, although I really didn't want to put it there as I think they
should be hidden from view. I realised I could mount it in front of the headstock by welding a bracket to the upper area of the headstock and then mounting the other end to the top yoke using the bolt hole conveniently
located at the front of the yoke, or by using a fork clamp with a threaded hole for mounting of a steering damper.


With the headlight mounted lower I realised I can use the original fairing subframe mount holes on the headstock instead and making a bolt on bracket to fit. So that's probably the next job.


I managed to test ride the bike with the new exhaust and carb set up. It's definitely perkier off the throttle and the jetting doesn't seem to be too far out, certainly above 5,000rpm it flies. Below that there is just a
slight wooliness so I think one of the other jets needs changing. According to the instructions which came with the pod filters I need to change the primary main jet. It also states that when using CV carbs that you shouldn't
change the needle height from standard. So when I fit the new primary main jets I'll put the needle clips back to their original position on the third groove down.


Getting closer to stage three: getting the angle grinder out!
Feel the Fear and do it anyway!

Read about my Project Ruby Racer - FZS 600 Custom build Click this link > > > http://foc-u.co.uk/index.php/topic,10613.0.html

Nebuchernezzer

  • Weekend Warrior
  • ***
  • Posts: 167
    • Main bike:
      FZS600 98-99
    • - Ktm250exc
    • View Profile
Re: Project Ruby Racer (custom FZS600)
« Reply #91 on: 03 December 2014, 10:49:09 am »
Good work,  Def interested in your pods and rejetting,  not many people seem to do it on the fazer and I'm interested :D

Fazerider

  • GP Hero
  • ******
  • Posts: 2,214
    • Main bike:
      FZS600 98-99
    • View Profile
Re: Project Ruby Racer (custom FZS600)
« Reply #92 on: 03 December 2014, 11:10:33 am »
Regarding battery position: I wouldn't expect the slightly warmer position to affect it, but from a handling point of view it makes sense to have the densest lump of mass as close to the mid-point of the bike as possible.

Ruby Racing

  • Club Racer
  • ****
  • Posts: 448
    • Main bike:
      FZS600 98-99
    • - Kawasaki ZRX1200R
    • View Profile
Re: Project Ruby Racer (custom FZS600)
« Reply #93 on: 03 December 2014, 05:05:13 pm »
Good work,  Def interested in your pods and rejetting,  not many people seem to do it on the fazer and I'm interested :D


Cheers and happy to be your Guinea Pig!  ;) [size=78%] [/size]
Feel the Fear and do it anyway!

Read about my Project Ruby Racer - FZS 600 Custom build Click this link > > > http://foc-u.co.uk/index.php/topic,10613.0.html

Ruby Racing

  • Club Racer
  • ****
  • Posts: 448
    • Main bike:
      FZS600 98-99
    • - Kawasaki ZRX1200R
    • View Profile
Re: Project Ruby Racer (custom FZS600)
« Reply #94 on: 03 December 2014, 05:07:22 pm »
Regarding battery position: I wouldn't expect the slightly warmer position to affect it, but from a handling point of view it makes sense to have the densest lump of mass as close to the mid-point of the bike as possible.


Thanks for the feedback.


As for the densest lump of mass? Well I do tend to sit close to the mid-point!  :lol
Feel the Fear and do it anyway!

Read about my Project Ruby Racer - FZS 600 Custom build Click this link > > > http://foc-u.co.uk/index.php/topic,10613.0.html

muddybuddy

  • Cager in Training
  • Posts: 10
    • Main bike:
      FZS600 00-01
    • - FZS600 cafe racer
    • View Profile
Re: Project Ruby Racer (custom FZS600)
« Reply #95 on: 03 December 2014, 05:40:31 pm »
Great work! Those headers do look a bit cheap especially the spatter. Also I have a couple of versions of those stainless headers and with both (and pods) I get a nasty hesitation at bout 8-9000 rpm at steady throttle. Power is good at 85+ bhp and the jetting etc seems ok on the dyno. The bike pulls through the hesitation band without fuss if you give it a handful. I think the design of the headers is important in this, the stainless ones are not sleeved down internally and lack the small balance pipes, and this I suspect, is leading to problems with exhaust gas flow. I shall be really interested to see how you get on with your exhaust/filter set up.

Ruby Racing

  • Club Racer
  • ****
  • Posts: 448
    • Main bike:
      FZS600 98-99
    • - Kawasaki ZRX1200R
    • View Profile
Re: Project Ruby Racer (custom FZS600)
« Reply #96 on: 03 December 2014, 05:48:07 pm »
Can you let me know what jetting changes you made to your carbs please?
Feel the Fear and do it anyway!

Read about my Project Ruby Racer - FZS 600 Custom build Click this link > > > http://foc-u.co.uk/index.php/topic,10613.0.html

ChristoT

  • Alleged Foc-u Daphnis & Chloe expert
  • GP Hero
  • ******
  • Posts: 5,207
  • Fluent in English, French and bullshit!
    • Main bike:
      FZS600 98-99
    • - Saab 9-3, caravan, hang glider
    • View Profile
Re: Project Ruby Racer (custom FZS600)
« Reply #97 on: 03 December 2014, 06:05:44 pm »
Can you let me know what jetting changes you made to your carbs please?

My old 6 had the Motad pipes too, and when I stripped the carbs, I found jetting was standard.
The Deef's apprentice

muddybuddy

  • Cager in Training
  • Posts: 10
    • Main bike:
      FZS600 00-01
    • - FZS600 cafe racer
    • View Profile
Re: Project Ruby Racer (custom FZS600)
« Reply #98 on: 03 December 2014, 06:59:36 pm »
Great work. Those stainless headers do look a little disappointing, especially the spatter. I note you are looking to use a breathing set up similar to mine. I have tried two different headers similar to yours and both give a nasty hesitation at around 8-9k rpm with steady throttle. I know the power is ok and the jetting is giving good dyno curves. My bike will power through the hesitation band on full throttle without any problem, so I am thinking the issue is something to do with exhaust gas flow. The stainless headers I am using, like yours lack the internal sleeves and the link pipes, This may be significant. I shall be interested to hear how you get on.

Ruby Racing

  • Club Racer
  • ****
  • Posts: 448
    • Main bike:
      FZS600 98-99
    • - Kawasaki ZRX1200R
    • View Profile
Re: Project Ruby Racer (custom FZS600)
« Reply #99 on: 03 December 2014, 10:50:07 pm »
Is there an echo in here?  ;)
Feel the Fear and do it anyway!

Read about my Project Ruby Racer - FZS 600 Custom build Click this link > > > http://foc-u.co.uk/index.php/topic,10613.0.html