Date: 20-05-24  Time: 16:49 pm

Author Topic: Project Ruby Racer (custom FZS600)  (Read 69590 times)

Ruby Racing

  • Club Racer
  • ****
  • Posts: 448
    • Main bike:
      FZS600 98-99
    • - Kawasaki ZRX1200R
    • View Profile
Re: Project Ruby Racer (custom FZS600)
« Reply #25 on: 21 December 2013, 12:33:28 am »

Day 29 - 15-12-13 - Before I make the brake bracket I thought I should get the rear wheel properly sorted, otherwise my brake bracket measurements might be out. First thing to do is purchase some
new wheel bearings. There are bearings in the sprocket carrier which I can leave in as they had spacers in and the ones I made replace them. In order to get the correct size replacements with a 20mm inside diameter,
not 25mm as per the KTM, I needed to get the old ones out. In the past I've used a drift and hammered them out. I wasn't able to do that with these as the spacer that sits in the hub couldn't be pushed aside far enough
for the drift to sit on the bearing.


I had bought a cheap blind bearing puller set off eBay. I tried with that with no success. It just kept slipping out. Took it to my evening class and no success there. Looking at the KTM service manual I saw there was
a special tool to remove them. So I went to my local KTM dealer to see if I could rent the special tool. They didn't have it, but the technician took my wheel away and within three minutes came back with the bearing
removed. Thanks Mark. I felt a right numpty so asked to see how he did it. He had the same blind bearing tool as mine, except it was a Snap On product. I could see the difference in quality and design compared to mine and
understood why my version didn't work. I didn't expect mine to last as long as a premium product, but I did expect it to actually work. I bought cheap as I would rarely use the tool.


Old bearing on left, new one on right.


I could now see why I couldn't push the hub spacer aside. It had three protrusions running almost the length of the shaft which I assume are there to keep the spacer central when fitting the axle. After some thought
I've come to the conclusion those protrusions aren't really needed as once the wheel is torqued up for the first time it should stay in place when the axle is next removed. I haven't seen them on the other spacers I've
encountered in the past so I reckon I'll be OK. If not I'll get some tabs welded on at each end.


Next up I started on the bracket to hold the Koso speedo. My first effort was pants as I got a measurement wrong. So I had to start again with a new design and another piece of 3mm aluminium. Got the second one
correct. Will get it bent on the the huge bending machine at college on Tuesday night. Wanted to press on with the upper fairing mounts, which are causing me a bit of a headache it has to be said, but without the rear
wheel fitted the bike isn't sitting correctly and I need to make sure I get the angle of the fairing correct and therefore the brackets.


Day 30 - 17-12-13 - Got my speedo bracket bent in the bending machine. Still needs finishing off, which I'll do once I know it fits OK.


Then I set to on making a new rear wheel hub spacer. This time I had the correct grade of aluminium for the job. I had purchased
a metre long length of 50mm thick round bar made of 6082 T6 aluminium. This is often referred to as aircraft specification so should be tough enough for the job.


It is certainly harder than the stuff I had been using up to this point. You can feel the difference on the lathe. As such it was taking me longer to work the metal. So much so that I didn't get the job finished in time.
I really hate that. When I start a job I like to finish it. As that was the last class before Christmas I have to wait until the 7 January before I can finish it. Well, I have to work over Christmas so I wont get much chance
to work on the bike anyway.


Feel the Fear and do it anyway!

Read about my Project Ruby Racer - FZS 600 Custom build Click this link > > > http://foc-u.co.uk/index.php/topic,10613.0.html

Ruby Racing

  • Club Racer
  • ****
  • Posts: 448
    • Main bike:
      FZS600 98-99
    • - Kawasaki ZRX1200R
    • View Profile
Re: Project Ruby Racer (custom FZS600)
« Reply #26 on: 23 December 2013, 12:21:53 pm »

Day 31 - 21-12-13 - I had a couple of hours spare so I worked on the speedo bracket for the Koso speedo. I tidied up all the edges by making them rounded, so no sharp edges. Once finalised I'll get some sand paper on it to really smooth things off. I'll wait until I've done some extensive test riding first to make sure it's strong enough then it'll be painted probably. Looking at it I'm wondering if it will be strong enough for the job. It's only held in place on the top yoke with a couple of M6 bolts, so may be subject to too much vibration.

Also not happy with where I've mounted the Starlane GPS-2 lap timer. I had planned to mount it in the same place I have done, only with the face on the same plane as the the speedo. Unfortunately the low height of the screen has prevented that. That said I haven't done the top fairing mount brackets yet, so I may find that I do in fact have room. If so then I could hide the power cable for lap timer. Where it is at the moment it would need too tight a bend in the wire and that would just end up breaking.

Next job will probably be to cut off the wires to the Yamaha ignition key and then temporarily fit them to the KTM ignition key to check that works. Actually more to check I've deciphered the wring diagram correctly! The Yamaha ignition barrel is knackered as it takes about 20 attempts to turn the key. Plus removing the KTM ignition would be a pain.


Feel the Fear and do it anyway!

Read about my Project Ruby Racer - FZS 600 Custom build Click this link > > > http://foc-u.co.uk/index.php/topic,10613.0.html

Fuzzy

  • WSB Pack Hound
  • *****
  • Posts: 683
    • Main bike:
      FZS600 00-01
    • View Profile
Re: Project Ruby Racer (custom FZS600)
« Reply #27 on: 25 January 2014, 07:06:29 pm »
Ooh, missed this last update. The cockpit is looking very neat, the lap timer being further forward does not detract from the overall appearance imo.

Ruby Racing

  • Club Racer
  • ****
  • Posts: 448
    • Main bike:
      FZS600 98-99
    • - Kawasaki ZRX1200R
    • View Profile
Re: Project Ruby Racer (custom FZS600)
« Reply #28 on: 26 January 2014, 12:14:44 am »
Ooh, missed this last update. The cockpit is looking very neat, the lap timer being further forward does not detract from the overall appearance imo.


Hit the NOTIFY button at the top, then you should get an email when I update.


Thanks for your kind words. It's mainly the dangling power wire to the lap timer that bugs me. Still, early days and I may find a better solution.


Another update coming soon.
« Last Edit: 07 February 2014, 12:25:21 am by Ruby Racing »
Feel the Fear and do it anyway!

Read about my Project Ruby Racer - FZS 600 Custom build Click this link > > > http://foc-u.co.uk/index.php/topic,10613.0.html

Fuzzy

  • WSB Pack Hound
  • *****
  • Posts: 683
    • Main bike:
      FZS600 00-01
    • View Profile
Re: Project Ruby Racer (custom FZS600)
« Reply #29 on: 26 January 2014, 12:22:31 am »
I did! I get notification emails for so many threads now, I've gone full circle and have ended up still missing stuff  :rolleyes

Looking forward to the next installment.

Ruby Racing

  • Club Racer
  • ****
  • Posts: 448
    • Main bike:
      FZS600 98-99
    • - Kawasaki ZRX1200R
    • View Profile
Re: Project Ruby Racer (custom FZS600)
« Reply #30 on: 08 February 2014, 11:52:15 pm »

Day 32 - 13-1-14 - My good friend Shaun who is a qualified electrician had given me directions how to connect up the loom to the KTM ignition switch. As my electrical knowledge is non existent I followed it to the letter using some block connectors. I plugged it into the loom and tried it out.

I could see the instrument backlights were on, but nothing else seemed to work. After about 15 seconds from turning on I could smell burning, then some smoke appeared from the connection at the loom. Ooops! That's not good and I immediately turned off and disconnected. Looks like I need to get Shaun back, because I haven't a clue.


Day 33 - 15-1-14 - After what seems like forever I was finally back at college last night and could finish the internal spacer for the rear wheel bearings. It's not perfect with regards to finish, so much so that my tutor commented that I had a VERY fine thread on the shaft of the spacer. I understood this mickey take immediately, as he was referring to the fact that I  hadn't got a dead smooth finish. I would like it to have been perfect, however it will live in the hub between two bearings never to be seen by anyone. What I was pleased about was the fact that my replacement was only 0.05mm longer than the OE one. I can live with that.

You will note that the design is different to the OE one. I couldn't replicate the OE one with my current machining ability, so this is a design that another of my mates came up with. So big thanks to Mike for that.


I also had a go at mocking up the rear brake caliper bracket using a piece of 3mm thick aluminium. At this stage I just wanted to ensure that I got the holes for the caliper positioned correctly in relation to the axle hole, before moving on to designing the caliper. I was pretty much spot on, so was chuffed with that.


Day 34 - 16-1-14 -Got the rear wheel bearings in today. Did the old trick of putting the bearings in the freezer overnight and then heating the hub with a heat gun. Previously I've used a hair dryer for this, but still ended up having to hammer the bearings into place. That doesn't feel nice. If you've not heard of this, the idea is the bearings contract in the cold, ever so slightly and the hub expands in the heat, ever so slightly, making bearing insertion easier.

I wasn't holding my breath. Once one side was done I got a bearing from the freezer. I lined it up as level as possible before I reached for the hammer and drift. As I let go of the bearing I expected it to sit in the opening. Nope. It just dropped straight down into position. No way! How happy was I? I couldn't believe it. I made sure it was in position then turned the wheel over. This is the important bit if you are to avoid much swearing. Make sure to put in the wheel spacer before fitting the second bearing. Done.


Further disbelief followed as the bearing on the other side dropped into place as easily as the first. Result. Now I could carry on with measuring up for the rear brake caliper using washers to space out the caliper to the correct point, as the 5mm thick disc only has a 7mm wide channel to run in. So I needed clearance of 1.5mm on either side of the disc. Not much room for error and obviously critical to get it right. Pretty confident with my measurements.


Day 35 - 17-1-14 - Carried on with the caliper bracket. Now I used the OE Fazer bracket to help me determine where the hole for the torque arm needed to be placed.


Day 36 - 18-1-14 - Back to the ignition wiring. Shaun had a good look at the wiring diagrams and spotted that the diagram I had given him for the Fazer didn't tie up with the wire colours actually in my bikes loom. He did an internet search and came up with the correct one. The smoking wires was because I had unwittingly given him the wrong information. DOH! He came up with a completely different set up which I'm glad to report worked perfectly. Thanks Shaun, I can now use the KTM ignition switch.


Back to work on the brake caliper bracket. Confident my measurements are correct I purchased some 10mm thick aluminium plate and made a template to mark out the shape. On some good old Corn Flake packet yet again. Guess what my favourite cereal is? Once done I decided on the lazy cutting out route of the plasma cutter at college. I've only used it once before, but it's a fantastic bit of kit. It literally cuts through metal like a hot knife through butter. Oh the power!

On the day of the evening I was going to college to cut out my bracket I realised I needed to redesign it. That was a bit last minute dot com, however just glad I realised it before wasting metal.


Day 37 - 27-1-14 - With a rather rough looking test bracket I found I was out by about 1mm as the disc was rubbing against the caliper. An easy fix, I just need to make the wheel spacer 1mm wider to push the bracket outwards. The mount for the torque arm also needs to be about 2mm further out.


Day 38 - 1-2-14 - I made new wheel spacers last Tuesday at college, taking into account the need to move the brake bracket out by 1mm. I used the 50mm thick round bar made of 6082 T6 aluminium and managed to get all four done just as the class ended. Glad I'm not paying someone to do this work, it would cost a fortune in labour. Well at least at the pace I work at! That's why this part of the job is taking me so long to complete. I make something one week, try it, then find I need to make a change, but have to wait for the following week to make a new part. Very frustrating.


Speaking of getting someone to make things for me. I realise the brake bracket is not something I can make as I don't have enough time left on my course and there is no time left to teach me how to use a milling machine. Bit disappointed about that. So I may have to look at getting one made on a CNC machine. I think I'll get in touch with Harris Performance as those boys have MotoGP experience and know exactly what they are doing. Hope it won't be too expensive.

Day 39 - 3-2-14 - Some time ago I'd managed to confirm that the front and rear wheels were aligned. Now when I checked they weren't! Was it the new spacers I'd made? Pretty sure they were correct. It was driving me mad, so I slept on it. It dawned on me that I hadn't torqued up the swing arm pivot bolt, so I did that. The front end was all tightened up correctly.

I had the rear wheel just pushed all the way back in the swing arm and tightened up correctly. I thought maybe I should use the adjustment marks cut into the swing arm. I did that and checked again. Now that's better. After much subtle adjustment of the front wheel direction I got it to be be between 1.1 and 1.5mm off centre to the right hand side. I don't know how critical that measurement is, although it should ideally be perfect I would think, but that doesn't seem too bad to me. Lets not forget this bike has had a front end impact, so there is still a chance the frame has a slight bend in it. Once I strip the frame down I should have a better idea.


« Last Edit: 08 February 2014, 11:58:25 pm by Ruby Racing »
Feel the Fear and do it anyway!

Read about my Project Ruby Racer - FZS 600 Custom build Click this link > > > http://foc-u.co.uk/index.php/topic,10613.0.html

noggythenog

  • GP Hero
  • ******
  • Posts: 4,991
    • Main bike:
      Other
    • - TRX Noggyfighter
    • View Profile
Re: Project Ruby Racer (custom FZS600)
« Reply #31 on: 09 February 2014, 11:12:08 am »
 
ooooooooft!!!
 
looking seriously nice fair play.
 
bet you're getting excited now, it is really taking shape.Gonna be a quality looking item me thinks. 8)
Easiest way to go fast........don't buy a blue bike

Ruby Racing

  • Club Racer
  • ****
  • Posts: 448
    • Main bike:
      FZS600 98-99
    • - Kawasaki ZRX1200R
    • View Profile
Re: Project Ruby Racer (custom FZS600)
« Reply #32 on: 09 February 2014, 04:34:56 pm »
Thanks Noggythenog.


I'm trying to contain myself! LOL. This bit seems to be taking a while, but I need the rolling chassis to be sorted before taking the angle grinder to it! That's when the real transformation will take place.


I'm going to make it the best I can, but hopefully she'll look the dogs. Time will tell.
Feel the Fear and do it anyway!

Read about my Project Ruby Racer - FZS 600 Custom build Click this link > > > http://foc-u.co.uk/index.php/topic,10613.0.html

Chris

  • GP Hero
  • ******
  • Posts: 1,982
    • Main bike:
      FZS600 02-03
    • View Profile
Re: Project Ruby Racer (custom FZS600)
« Reply #33 on: 09 February 2014, 04:49:05 pm »
Amazing effort man! Starting to really take shape.

Chris

It wouldn't be fun if it was easy, I just wish it wasn't this much fun.

Ruby Racing

  • Club Racer
  • ****
  • Posts: 448
    • Main bike:
      FZS600 98-99
    • - Kawasaki ZRX1200R
    • View Profile
Re: Project Ruby Racer (custom FZS600)
« Reply #34 on: 09 February 2014, 04:56:06 pm »
Cheers Chris.  :thumbup
Feel the Fear and do it anyway!

Read about my Project Ruby Racer - FZS 600 Custom build Click this link > > > http://foc-u.co.uk/index.php/topic,10613.0.html

ChristoT

  • Alleged Foc-u Daphnis & Chloe expert
  • GP Hero
  • ******
  • Posts: 5,207
  • Fluent in English, French and bullshit!
    • Main bike:
      FZS600 98-99
    • - Saab 9-3, caravan, hang glider
    • View Profile
Re: Project Ruby Racer (custom FZS600)
« Reply #35 on: 09 February 2014, 09:10:15 pm »
Looks awesome! When my bike's done, we'll have to do a custom FZS meet!  :lol
The Deef's apprentice

Ruby Racing

  • Club Racer
  • ****
  • Posts: 448
    • Main bike:
      FZS600 98-99
    • - Kawasaki ZRX1200R
    • View Profile
Re: Project Ruby Racer (custom FZS600)
« Reply #36 on: 09 February 2014, 11:11:41 pm »
You're on!  :D
Feel the Fear and do it anyway!

Read about my Project Ruby Racer - FZS 600 Custom build Click this link > > > http://foc-u.co.uk/index.php/topic,10613.0.html

ChristoT

  • Alleged Foc-u Daphnis & Chloe expert
  • GP Hero
  • ******
  • Posts: 5,207
  • Fluent in English, French and bullshit!
    • Main bike:
      FZS600 98-99
    • - Saab 9-3, caravan, hang glider
    • View Profile
Re: Project Ruby Racer (custom FZS600)
« Reply #37 on: 09 February 2014, 11:16:45 pm »
You're on!  :D

The Ruby Racer, the Noggy Fighter, Project Fazer - The ChristoFighter, Wraith's bike, DarthFazer's bike... any other 600s?

The Deef's apprentice

Chris

  • GP Hero
  • ******
  • Posts: 1,982
    • Main bike:
      FZS600 02-03
    • View Profile
Re: Project Ruby Racer (custom FZS600)
« Reply #38 on: 10 February 2014, 12:57:48 am »
Mines customised... just still has a fairing...   :(

Chris

It wouldn't be fun if it was easy, I just wish it wasn't this much fun.

ChristoT

  • Alleged Foc-u Daphnis & Chloe expert
  • GP Hero
  • ******
  • Posts: 5,207
  • Fluent in English, French and bullshit!
    • Main bike:
      FZS600 98-99
    • - Saab 9-3, caravan, hang glider
    • View Profile
Re: Project Ruby Racer (custom FZS600)
« Reply #39 on: 10 February 2014, 07:36:36 am »
So will mine, and so have DarthFazer and Wraith. It's not limited to streetfighters!
The Deef's apprentice

noggythenog

  • GP Hero
  • ******
  • Posts: 4,991
    • Main bike:
      Other
    • - TRX Noggyfighter
    • View Profile
Re: Project Ruby Racer (custom FZS600)
« Reply #40 on: 10 February 2014, 03:30:19 pm »
Hey Christo are we talking about a customised club or a crashed club here??? ;)
Easiest way to go fast........don't buy a blue bike

Punkstig

  • GP Hero
  • ******
  • Posts: 2,191
    • Main bike:
      FZS600 02-03
    • View Profile
Re: Project Ruby Racer (custom FZS600)
« Reply #41 on: 10 February 2014, 05:13:49 pm »
FazerCat!
Some say...

MarkWales

  • Club Racer
  • ****
  • Posts: 250
    • Main bike:
      FZS600 98-99
    • View Profile
Re: Project Ruby Racer (custom FZS600)
« Reply #42 on: 10 February 2014, 08:27:13 pm »
Looking good


ChristoT

  • Alleged Foc-u Daphnis & Chloe expert
  • GP Hero
  • ******
  • Posts: 5,207
  • Fluent in English, French and bullshit!
    • Main bike:
      FZS600 98-99
    • - Saab 9-3, caravan, hang glider
    • View Profile
Re: Project Ruby Racer (custom FZS600)
« Reply #43 on: 10 February 2014, 10:53:29 pm »
Hey Christo are we talking about a customised club or a crashed club here??? ;)

I have no idea what you're talking about!!  :pokefun
The Deef's apprentice

Ruby Racing

  • Club Racer
  • ****
  • Posts: 448
    • Main bike:
      FZS600 98-99
    • - Kawasaki ZRX1200R
    • View Profile
Re: Project Ruby Racer (custom FZS600)
« Reply #44 on: 10 February 2014, 10:59:20 pm »
Feel the Fear and do it anyway!

Read about my Project Ruby Racer - FZS 600 Custom build Click this link > > > http://foc-u.co.uk/index.php/topic,10613.0.html

ChristoT

  • Alleged Foc-u Daphnis & Chloe expert
  • GP Hero
  • ******
  • Posts: 5,207
  • Fluent in English, French and bullshit!
    • Main bike:
      FZS600 98-99
    • - Saab 9-3, caravan, hang glider
    • View Profile
Re: Project Ruby Racer (custom FZS600)
« Reply #45 on: 20 February 2014, 10:04:25 pm »
10 days sans update? What's the news from the front, man?  :)
The Deef's apprentice

Ruby Racing

  • Club Racer
  • ****
  • Posts: 448
    • Main bike:
      FZS600 98-99
    • - Kawasaki ZRX1200R
    • View Profile
Re: Project Ruby Racer (custom FZS600)
« Reply #46 on: 20 February 2014, 10:36:24 pm »
Got some of my ramblings typed up. Just need to do a couple of photos. Hopefully tomorrow.  ;)
Feel the Fear and do it anyway!

Read about my Project Ruby Racer - FZS 600 Custom build Click this link > > > http://foc-u.co.uk/index.php/topic,10613.0.html

risticuss

  • Club Racer
  • ****
  • Posts: 260
    • Main bike:
      FZS600 02-03
    • View Profile
Re: Project Ruby Racer (custom FZS600)
« Reply #47 on: 22 February 2014, 04:37:45 pm »
T'is looking good.


Just a thought about the rear brake caliper bracket, have you thought about getting one cast.


I'm an apprentice patternmaker and have been looking for a project to do on my fazer, but have yet to come up with something. Was thinking about changing the foot pegs but not got round to it yet.


Not sure how much it'd be to get it cast, but if I did the pattern work in my spare time wouldn't cost ought and we have an engineering firm two doors down who could machine it.


Just another option.


Simon

Ruby Racing

  • Club Racer
  • ****
  • Posts: 448
    • Main bike:
      FZS600 98-99
    • - Kawasaki ZRX1200R
    • View Profile
Re: Project Ruby Racer (custom FZS600)
« Reply #48 on: 24 February 2014, 01:17:15 am »
Hi Simon.


That's a very kind offer and really appreciate it. However I've already got things moving with Harris Performance. They are going to CNC me a brake calliper bracket. However if something else crops up in the future may I take up the offer then?
Feel the Fear and do it anyway!

Read about my Project Ruby Racer - FZS 600 Custom build Click this link > > > http://foc-u.co.uk/index.php/topic,10613.0.html

Ruby Racing

  • Club Racer
  • ****
  • Posts: 448
    • Main bike:
      FZS600 98-99
    • - Kawasaki ZRX1200R
    • View Profile
Re: Project Ruby Racer (custom FZS600)
« Reply #49 on: 24 February 2014, 01:20:26 am »

Day 40 - 15-2-14 - I've decided to redesign my speedo bracket. Although I've been trying to mount up the bikini fairing, that's mainly intended for the race bike set up. For the road I'm
planning on a large AMA race bike type number board, incorporating a small headlight to keep things legal and for practical night time use, although I hardly ever ride at night unless I'm in Europe. I
need the speedo to be much closer to the yokes, well as close as possible, so the gap between forks and number board is not too great. That would look well nasty!
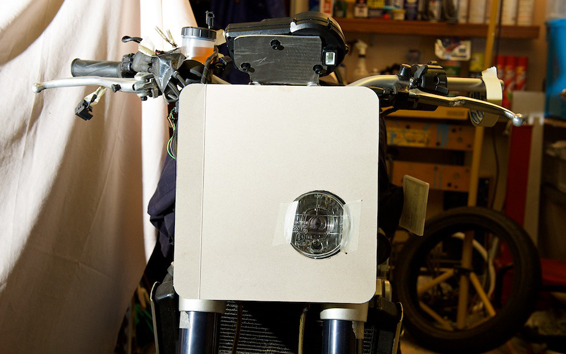


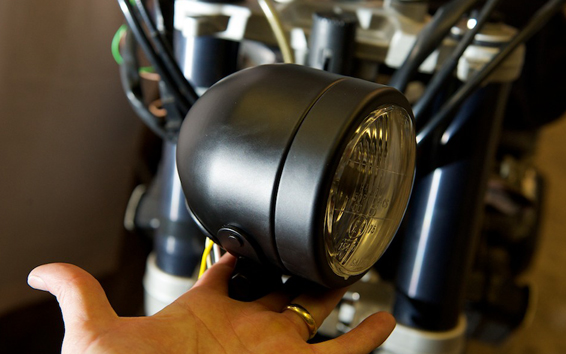
I did buy some headlights from a B Whizz scooter as they were nice and small. I was just going to use one of them, however I've rejected them as one light is only 10 watts! I'd be lucky to see
the white line in front of me, let alone the road ahead. So I've bought a single Dominator headlight, which is a dual filament bulb 60/55 watt. It's only 90mm wide so about the smallest I could find. I
didn't really fancy projector headlights for two reasons. First I wanted a more retro look and second, you have to have two, one for dip and one for main. I just want one light. I'm going to have to
fabricate a different rear section to the light as the one it comes with is too deep.


Last Tuesday I made my new wheel spacers at college. Finally I had the chance to fit them. I had taken off 1.5mm from the brake side and increased the spacer on the sprocket side by the same
amount, so in theory my wheels would now be perfectly in line. Wrong! I kept getting different figures with the worst showing the wheels out of alignment by 5mm! What is going on? I had a think and
realised that my straight edges may not be sitting in exactly the correct position. I rectified this and measured again. Nope, still out.


So I went back to my first spacers and checked again. Much better. In fact heaps better than originally. The wheels were only out of alignment by 0.2mm! That's pretty damn close. I rechecked
three times and kept getting the same result. To further check things I took the rear wheel out and refitted it. Same results again, in fact the alignment difference was now down to 0.14mm. I'm not
going to get any better than that.


The only other thing I did before fitting the altered spacers mentioned in my first paragraph was to undo the front wheel and the yokes and twist the front wheel to the right, as I felt the left handlebar
was further forward than the right. But this shouldn't effect the alignment front to rear surely? Whatever, I'm happy again.


I've been in contact with Harris Performance and they've given me a reasonable quote to CNC a rear brake caliper bracket. Once I've got another set of rear wheel spacers made and check the wheel
alignment is still bang on, I'll get my drawings done for the bracket and get that ordered.


I've borrowed a laser from my mate Shaun and it's looking like the rear sprocket is offset by 2mm. My initial measurements suggested 2.5mm, however since then I've had the tyres removed so I can
get a much more accurate measurement and I've found that the KTM sprocket is 2mm further out than the Fazer wheel. I'm glad the laser seems to back that up, as it also confirms that I've got the rear
wheel central. However I'm surprised it's only 2mm offset as the Fazer has a 160 rear tyre, but the KTM a 180.


What is interesting is that the width of the Fazer tyre (a 160) at it's widest point is actually 170mm, whilst the KTM is 187mm at its widest point.


Day 41 - 23-2-14 - I made a new speedo bracket at college last Tuesday evening. However even before making it I'd redesigned it! Originally I thought I would mount it above the top yoke
using the M10 bolts that hold the handlebar clamps in place. Then I realised this would look very nasty and decided to use the same bolts, but mount it under the top yoke.


When I fitted it it made the speedo stick out too far forward. So I redesigned it yet again! This time I used the M8 bolts at the front of the top of the handlebar clamp. This gets the speedo further back,
however it does make it harder to read as it's closer to the rider. Think I'll just have to live with that as I don't want my number board mounted too far in front of the forks. In fact I want it as close as possible.
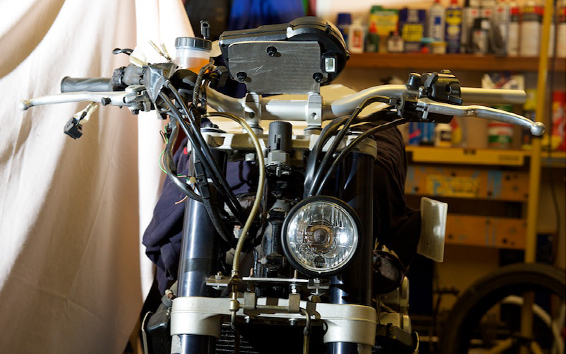
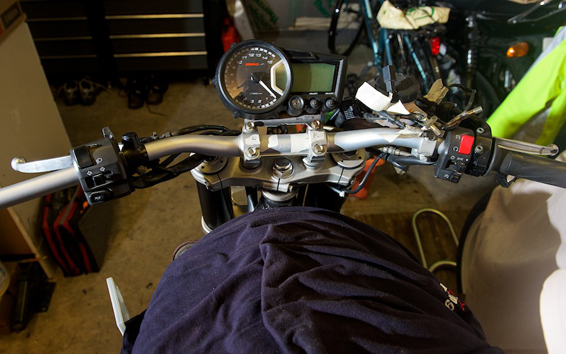
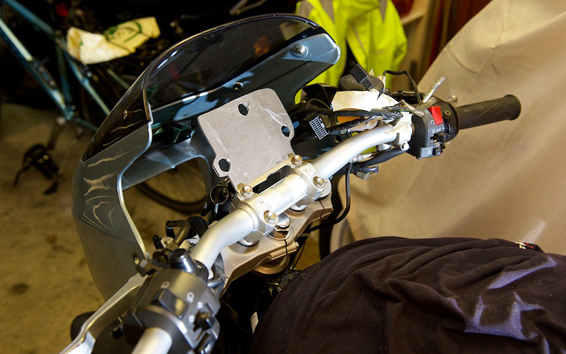


There will have to be some compromise as I need to fit the headlight behind as well. The single Dominator light I bought has a very large rear cover. Luckily this can be removed, so I plan to fabricate
a different rear cover that will allow me to mount the headlight as far back between the forks as possible.


I also made a new wheel spacer for the rear wheel disc brake side. Same dimensions as the one before last. After fitting I found that my rear wheel was too far to the left by 0.5mm. I think that's an
acceptable amount. Seems like I've been doing nothing but make rear wheel spacers! Hopefully That's going to be the last of it until after the initial shake down runs. Well it will have to be as I only have
two more weeks left on my college evening classes. I intend to try and get on the next one, but that wont start again until September, so I'm going to have difficulty making certain parts very soon.
Feel the Fear and do it anyway!

Read about my Project Ruby Racer - FZS 600 Custom build Click this link > > > http://foc-u.co.uk/index.php/topic,10613.0.html